If you want to create your own website, nothing can beat using WordPress. It’s easy to use, can be infinitely customized and has thousands of themes and plugins to help make it stand out.
If you’re a developer, creating a fully functional website for your clients may take months.
Luckily, you can save precious time and effort as it is relatively easy to build a website using WordPress.
You can create a wide range of websites including blogs, eCommerce stores, multi-vendor marketplaces, portfolios, ERP, forums, membership websites and anything you can imagine!
In this article, we’ll talk about what WordPress stands for and what types of websites you can create with it. Then we’ll take a look at the difference between WordPress.org and WordPress.com.
Next, we’ll take a look at the benefits of building a website using the WordPress block editor over a page builder.
After that, we’ll cover how to build a website with WordPress in 2025.
By the end of this page, you’ll have everything you need to be able to build a fully functioning website!
- Prerequisites to build your own website
- A brief introduction to WordPress and why you should use it
- Benefits of using WordPress block editor over a page builder
- How to build a website with WordPress (step by step)
- How to optimize your WordPress website
- Tips to create different types of websites
- FAQs on creating a website with WordPress
- Get ready to take your WordPress website to the next level!
Prerequisites to build your own website
Building a website requires just a few key ingredients. The rest will come down to creating content and breathing life into your new site.
Here’re the basic components you’ll need to build a website:
- Domain: The unique address of your website.
- Hosting: A service that stores your website on the internet.
- WordPress: A content management system (CMS) that makes it easy for you to create and manage your website.
- Themes: WordPress themes are skins that can change the way your website looks and feels.
- Plugins: Little apps you can add to your website to give it new features.
A brief introduction to WordPress and why you should use it
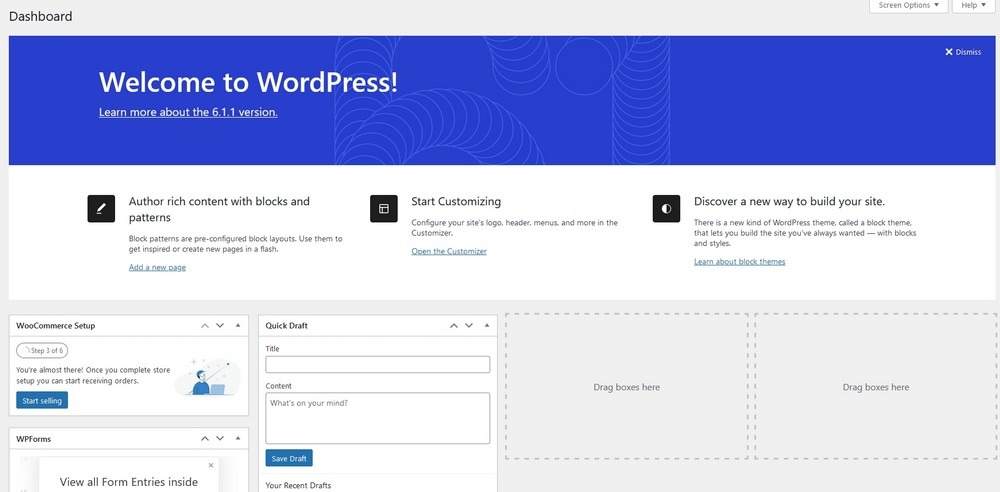
WordPress is a free and open-source CMS (Content Management System) that allows you to create any type of website.
It’s the most popular CMS you can use, as it powers over 43.3% of websites. It abounds with many free and premium themes and plugins that help make it one of the most flexible platforms on the internet.
It is also well-documented and has a large community of users, so a wealth of knowledge and support is available.
WordPress is optimized for mobile devices and search engines and is easy to manage, with the ability to create, edit and publish content.
There are several reasons you might choose to use WordPress to build your website:
- Open source software: WordPress is free to use and can be customized in any way you like.
- Flexibility: You can use WordPress for a wide range of projects, including blogs, business websites, forums, and online stores.
- Modest learning curve: WordPress is user-friendly and has an intuitive interface so you can learn it quickly.
- Well documented: Many resources are available to help you learn how to use WordPress and customize it to your needs.
- A large community of users: WordPress has a large group of users that are always willing to help and engage.
- Mobile-friendliness: WordPress is designed to be mobile responsive so your website will look great on any device.
- Search engine friendly: WordPress is optimized for search engines making it easier for your website to rank in search results.
- Easy to manage: Easily create, edit, and publish content and manage your website without technical knowledge.
These benefits make WordPress a great choice for building any website!
Types of websites you can build with WordPress
From simple blogs to complex eCommerce stores, LMS (Learning Management System) websites to membership portals, you can create anything you can imagine with WordPress.
Here are just a few types of websites you can create:
- Blog: The main feature of a blog is that it consists of a series of articles that are generally organized chronologically.
- eCommerce website: An eCommerce website lets you sell goods and services directly to consumers. A good example of it would be a custom frame store.
- An eCommerce website lets you sell goods and services directly to consumers. A good example of it would be a custom frame store. If you’re looking to build a successful online store, investing in eCommerce development services can help you create a seamless shopping experience with secure payment options and user-friendly navigation.
- Portfolio website: You can showcase your work or achievements with a portfolio website.
- LMS website: With an LMS or learning management system like Eduflow, you can create and sell courses online.
- Multivendor website: Like a shopping mall, you can allow multiple sellers to register and sell products online.
- Online forum: An online forum is a website that allows users to post and discuss topics with each other, usually organized around a specific theme or topic.
- Membership website: With a membership website, you can sell access to content in exchange for a subscription.
- Job board website: A job board website allows you to list job openings and help people search and apply for jobs online.
- Social network website: A social network website is where users can connect and share information with one another.
- Directory website: A directory website lists businesses, organizations, or other resources in a specific category or location. It’s like an online version of the yellow pages.
- Non-profit website: It’s a charitable website often used to provide information about the organization’s mission, programs, and how to get involved or donate.
- ERP website: ERP stands for “enterprise resource planning.” An ERP website allows a business to manage and coordinate all of the different processes and functions such as finance, human resources, manufacturing, and supply chain management.
- Dating website: A dating website is a matchmaking service where users can connect with each other in exchange for a subscription to form relationships.
- Betting website: A betting website allows users to place bets on sporting events, casino games, or other types of contests.
Those are just a few examples of what’s possible.
WordPress is a versatile platform, so you really can create any type of website you can imagine!
Why use WordPress.org over WordPress.com to make a website?
Detailed Post: WordPress.com vs WordPress.org – What’s the Difference and Which Is Better?
WordPress.org and WordPress.com are both great options for creating a website, but there are some key differences.
One of the biggest differences between WordPress.org and WordPress.com is the level of control and flexibility you have.
WordPress.org is not only self hosted but also an open-source platform that lets you customize every aspect of your website.
WordPress.com is a SaaS based platform where you’ll have limited control. You’ll only get limited themes and plugins won’t have the ability to edit your website’s code as it’s not open source.
Finally, you can monetize your website better with WordPress.org than WordPress.com as WordPress.com imposes some strict rules on users.
When you read posts like this one and it just says ‘WordPress’ it’s usually referring to the self-hosted version at WordPress.org
Benefits of using WordPress block editor over a page builder
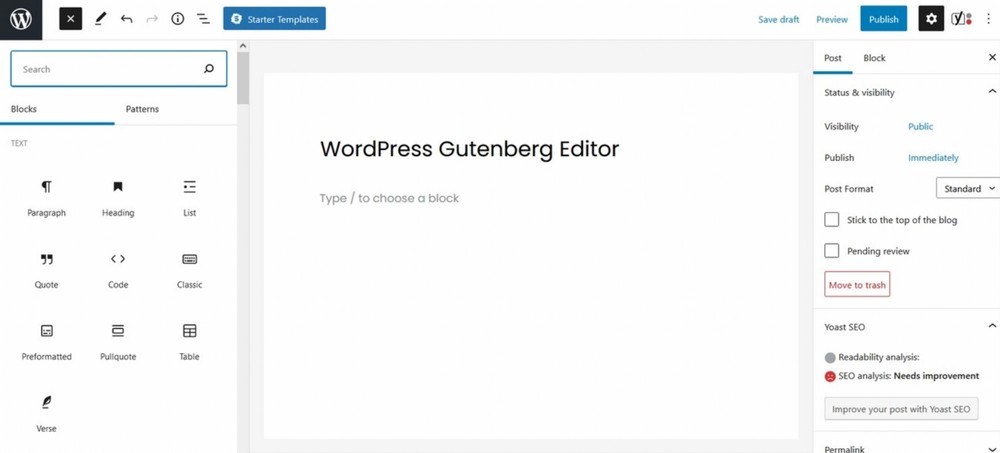
You have several benefits when building a website using the WordPress block editor (formerly known as Gutenberg) over a page builder.
Some of them are:
- Easier to use and learn, especially for beginners.
- Block editing is a native feature of WordPress.
- Uses a “block” system, which makes it easier to rearrange and customize the layout of your pages.
- More lightweight and performs faster than some page builders.
- Use different templates just like other page builders.
- More SEO friendly as it uses clean and valid HTML code.
The WordPress block editor offers a simple and streamlined way to build and customize your website.
That makes it a great option for beginners and even for experienced developers.
While using proper tools, it is 100% possible to maintain the website yourself. In case you need help setting up some advanced features, there are a bunch of web developer recruitment agencies available on the market.
Page builders are great and deliver the tools you need, but can slow websites down and can get in the way as much as they help.
How to build a website with WordPress (step by step)
In this part of the post, we’ll walk you through the steps of creating a WordPress website from start to finish.
We’ll cover everything you need to know to get your website up and running in 2025.
Whatever type of website you’re planning to build, the basic steps are all the same.
Step 1: Register and purchase a domain name
The first step to creating your very own WordPress website is to register and purchase a domain name. If you’ve already taken care of this, you can move on to step 2.
Every website needs a domain name. Your domain name is the human-readable text that you can use to visit your website from your browser.
For example, the domain name for Google is “www.google.com.” When you type it into your web browser, your computer sends a request to Google’s server and retrieves the webpage to display it to you.
What are the different types of domain name extensions?
Domain extensions are an indication of the type of a website. They usually appear at the end of a domain name, for example, .com, .org, .edu and so on..
You’ll find hundreds of different types of extensions. These extensions are also known as TLD or Top Level Domains.
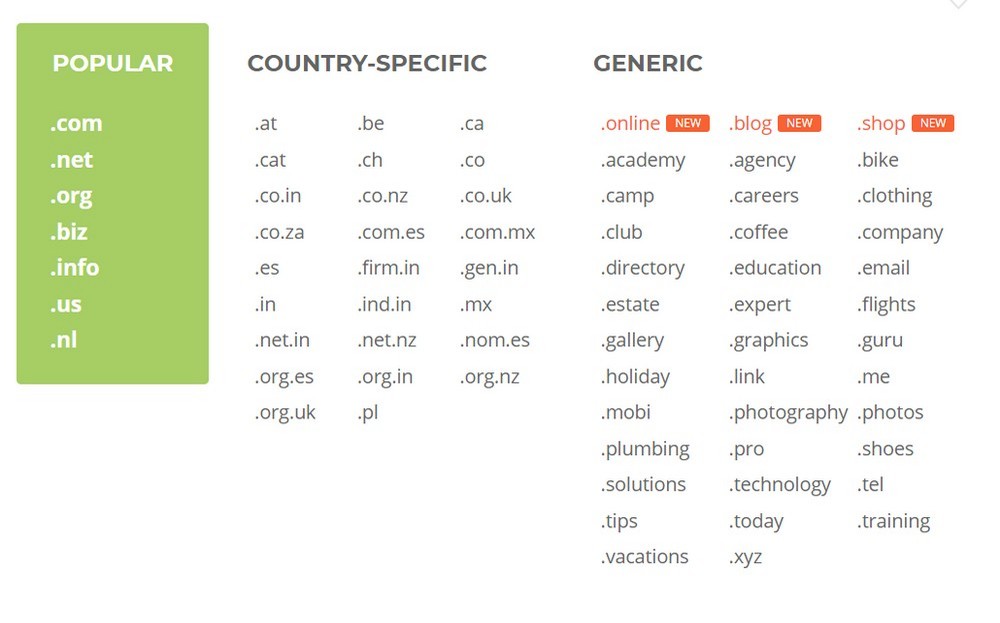
You may have seen the following TLDs are:
- .edu: Educational institutions
- .biz: Businesses
- .net: Network organizations
- .org: Non-profit organizations
- .mil: Military
- .com: Commercial organizations
- .int: International organizations
- .gov: Government agencies
- .info: Information sources
Apart from the above options, you can also find some country specific TLDs, such as .us (United States), .in (India), .fr (France) and others.
Which extension or TLD do you need?
The choice of a TLD depends on your intended use of the domain name and your target audience.
Some TLDs are more suited for certain types of websites or organizations than others.
If you’re targeting a specific country, you may want to consider using a country specific TLD such as .us or .uk. Otherwise we recommend using a .com extension for a business website.
Ultimately, the choice of a TLD is a personal preference and you should choose the one that best represents your brand or website.
Where can you get a domain?
You can buy a domain name from your web hosting provider. Prices for buying domain names can vary from $10 to $20 per year.
Some popular options include NameCheap, NameSilo, HostGator, Sedo, Flippa, Design.com Domain Name Generator, and many others.
For the purposes of this guide, we will use NameSilo to find and purchase a domain name.
When you go to NameSilo’s homepage, you will see a search bar at the top where you can look for available domain names.
Assume that we’ll buy a domain, “ourwpwebsite.com”.
So, let’s find a domain name like “ourwpwebsite.com” on NameSilo.
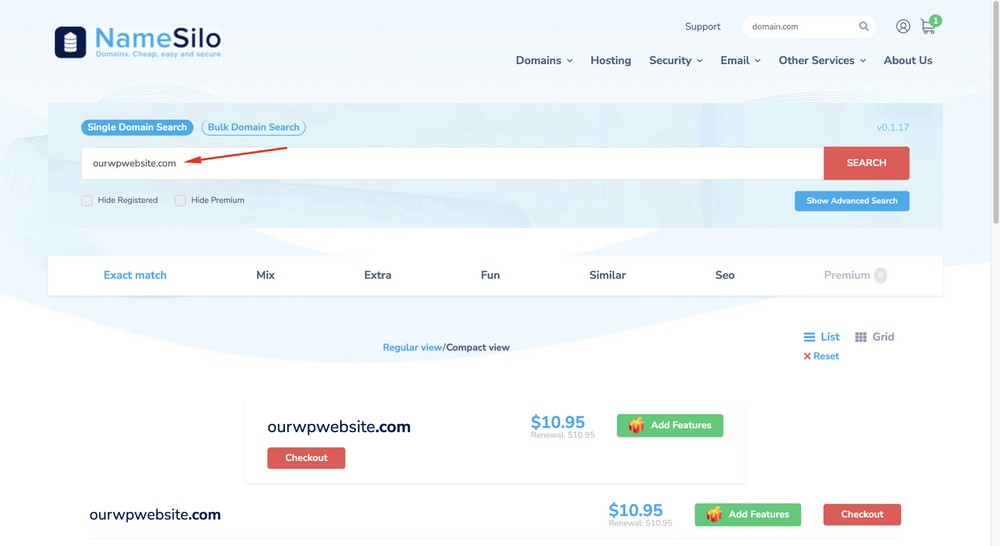
Many domain registration companies will try to sell additional features such as SSL (Secure Sockets Layer), domain privacy, a website builder and email addresses.
These are all optional and some, like SSL and a website builder will usually be included for free with your hosting plan.
Domain privacy is optional but not essential and you should get a number of email addresses for free with the domain.
If a provider doesn’t include email addresses with the domain, work with one that does.
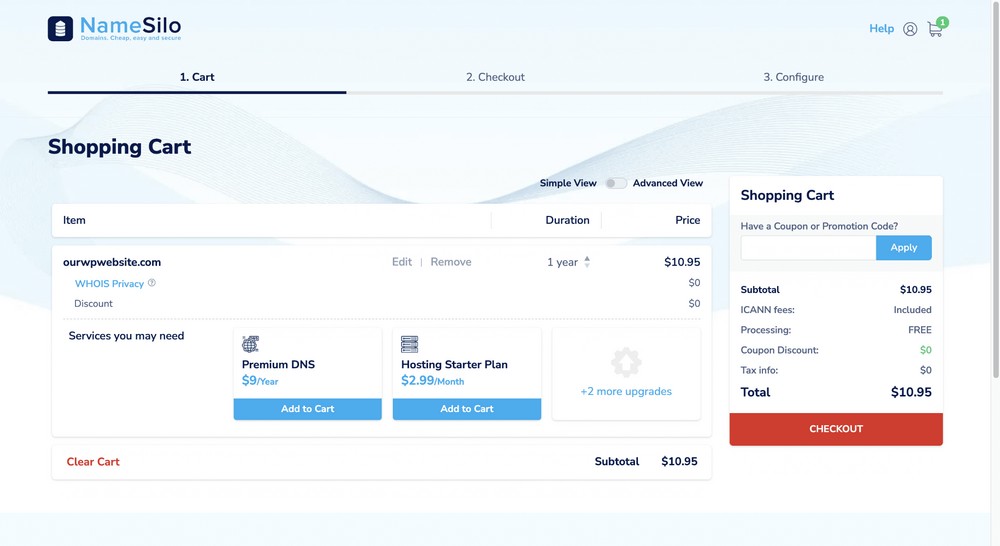
Once you buy the domain it’s time to choose your web host.
Step 2: Choose a hosting provider for your website
When you build a website, you need a place to store all of the files, images, and other media.
That’s where web hosting comes in.
Hosting providers usually offer various plans that cater to different needs and budgets, such as VPS hosting, shared hosting and dedicated hosting.
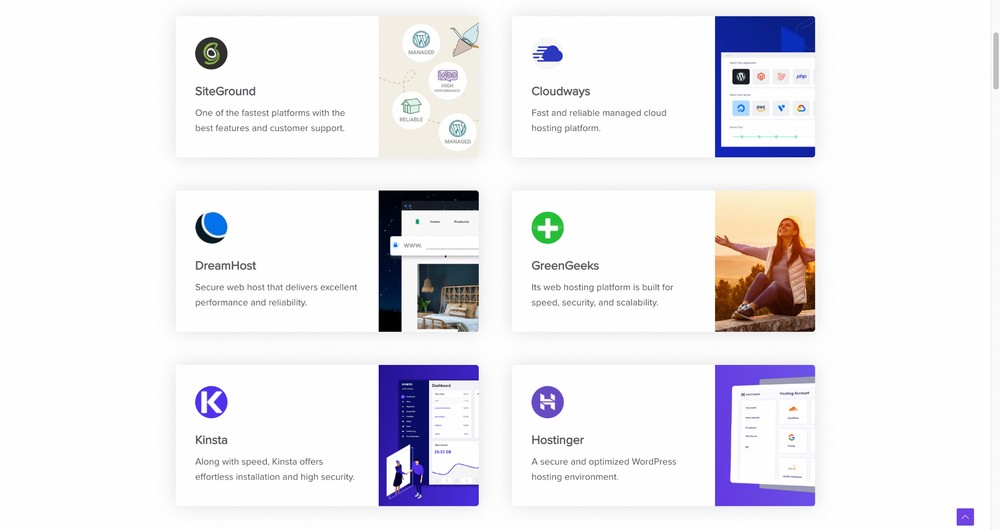
Some of the most popular hosting providers include SiteGround, Cloudways, DreamHost, InMotion, BlueHost, HostGator, and Hostinger.
When you choose a hosting provider never compromise on speed, scalability and uptime. You should also look at customer reviews to check the reliability of their service.
Choosing a reliable hosting provider
We recommend SiteGround as it provides top performance, advanced security tools and excellent customer support.
It’s also optimized for WordPress, making it easy to install and use the platform.
SiteGround offers a WP caching plugin to improve website performance, as well as free CDN, pre-installed SSL and daily backups.
If you’re new to website building and want an easy way to launch a WordPress site, SiteGround’s Managed WordPress hosting is a good option to consider.
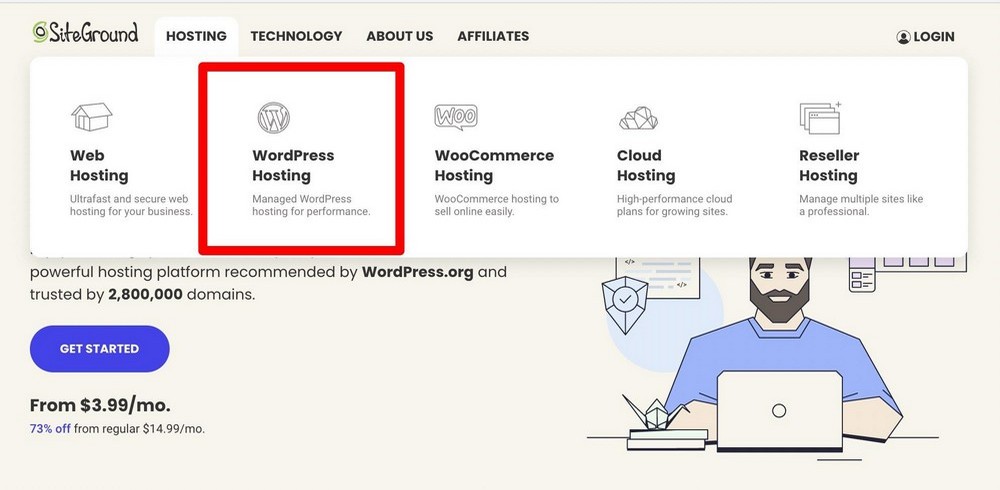
It’s optimized for WordPress and makes it easy to install and set everything up.
The StartUp plan ($3.99 per month) is suitable for one website and can handle up to 10,000 visits per month. It’s a good plan to start with.
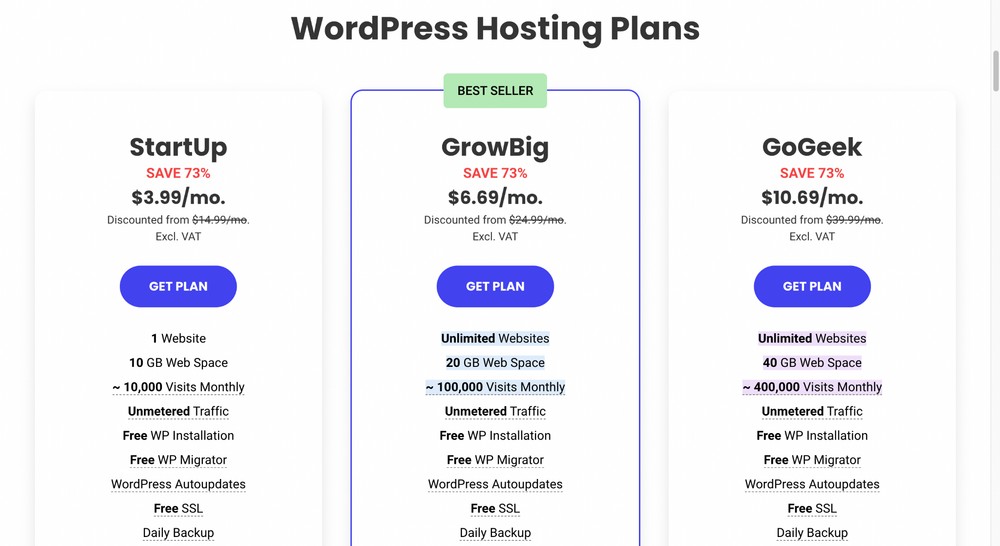
If you want the best site performance and plan to host multiple websites, you might consider the GrowBig plan ($6.69 per month).
The plan ships with SiteGround’s SuperCacher plugin you can use to boost the speed of your website.
If you are building a resource-intensive WordPress website, such as an eCommerce site, the GoGeek plan ($10.69 per month) might be a better fit.
It offers the highest level of server resources and comes with priority advanced support, which means your tickets will be handled by SiteGround’s most experienced agents first.
You could also consider CloudWays as you will get the Astra Pro for free with selected plans.
Step 3: Install WordPress
Setting up WordPress is super easy – just a few clicks and you’re good to go!
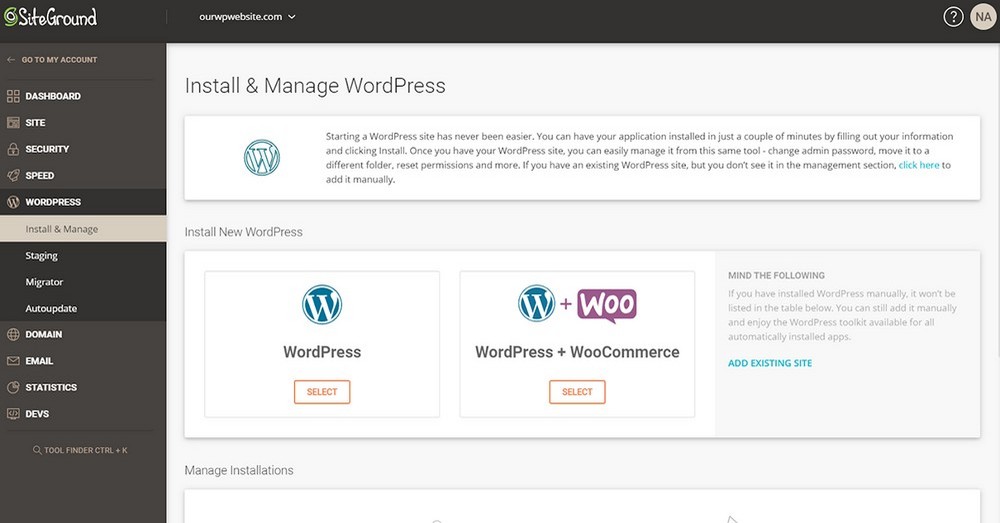
There are a few different ways to install WordPress, but our favorite is the SiteGroud setup wizard.
To install WordPress with the wizard, check out the instructions and screenshots below to see how you can do it by yourself.
Once you choose WordPress in the wizard, you’ll just need to create a username and password, and in under a minute, your WordPress installation will be all set up!
PRO TIP
If you already have a WordPress site hosted somewhere else, don’t worry – SiteGround makes it super easy to migrate your site over with just a few clicks (and it happens super fast).Handy if you have multiple websites.
Other hosts also offer free migration. Check for it on the service outline just to make sure.
Once you’ve installed WordPress, go back to your SiteGround client dashboard to see a list of all your website installations – just click on the Websites tab from the top menu.
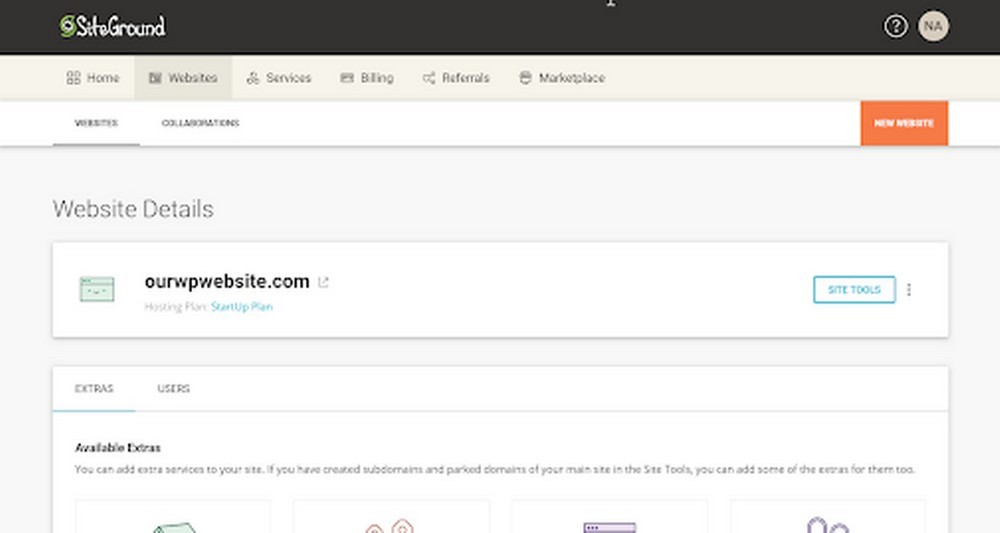
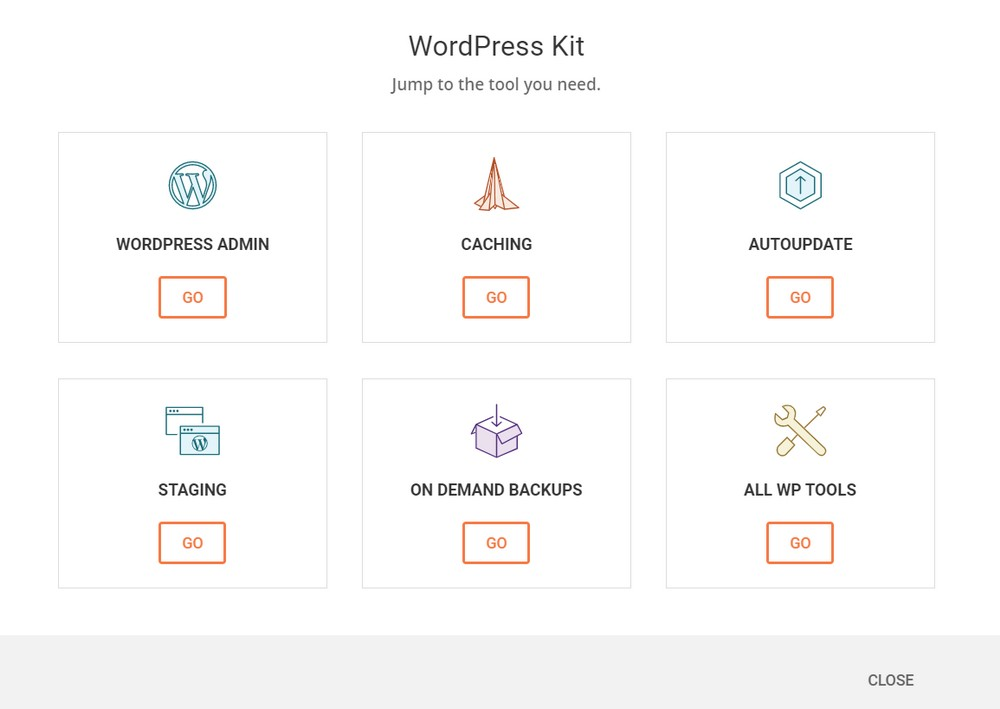
When you click on Site Tools, this tab will appear.
To access your WordPress dashboard, just click on the WordPress Admin option.
How can you access your WordPress dashboard?
Just open your browser and use the URL, “yourdomain.com/wp-admin” to locate the dashboard. That’s how easy it is!
This will bring you to a login screen that looks like this.
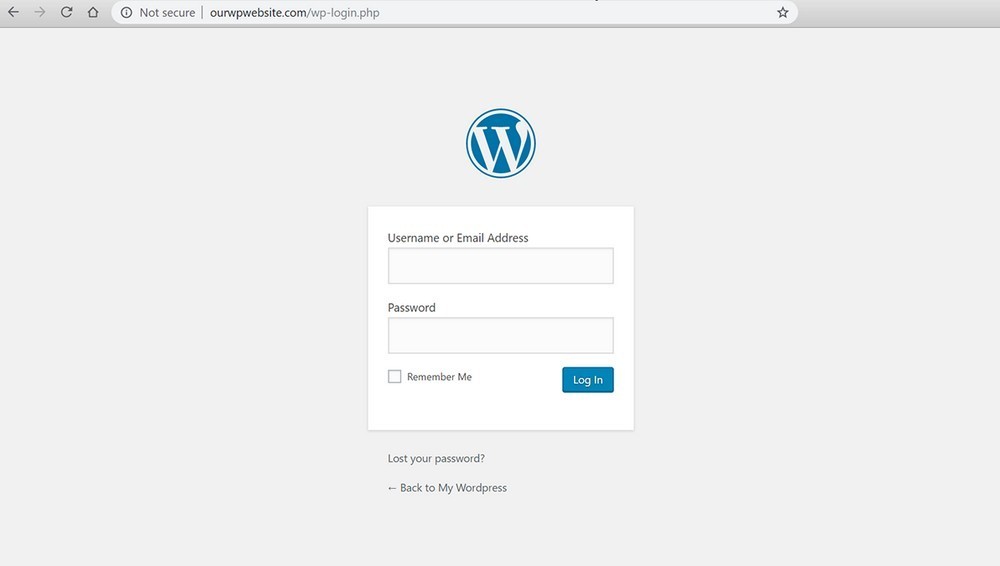
To sign in to the dashboard, you need to enter the password and username you used while installing WordPress. That’s it!
Step 4: Choose and install a WordPress theme

Now you’ve set up the foundation for your website (domain name, hosting, and WordPress), it’s time to install a great-looking theme.
When choosing a WordPress theme, keep in mind that it should be fast, customizable, scalable, SEO friendly and page builder friendly.
Free WordPress themes vs. paid WordPress themes
If you just need basic functionality on your website, a free theme might be a good option.
For example, a free theme might be enough if you’re a solopreneur and you’re using your website to showcase your brand.
However, free themes have some limitations regarding what you can customize or update.
That’s where paid themes come in. They offer more personalization, customization, and additional functionality compared to free themes.
And there are plenty to choose from, over 10,000+ themes are available in the WordPress ecosystem.
Prices for paid themes vary, but you can expect to pay anywhere from $40 to $100 depending on the vendor and the options you choose.
Where to find a theme that suits you?
There are many places to find WordPress themes. Here are a few options:
- The WordPress theme directory: This is a great place to start if you’re looking for free WordPress themes. It’s the official WordPress theme directory where themes are available to download and use on your site.
- Third-party theme stores: There are lots of companies that sell WordPress themes, and many of them offer both free and paid options. Some popular options include WPAstra, ThemeForest, Elegant Themes and StudioPress.
- Your hosting provider: Some hosting companies, like SiteGround, offer a selection of free themes that you can use on your site. It’s worth checking out their theme library to see if they have something that fits your needs.
You can also access the WordPress.org theme directory from your WordPress admin dashboard.
We recommend you use the free Astra theme on your website. It is lightweight, SEO friendly, customizable, and supports all page builders, including the WordPress block editor.
Best of all, it’s fully compatible with Spectra so there will be no issues customizing it!
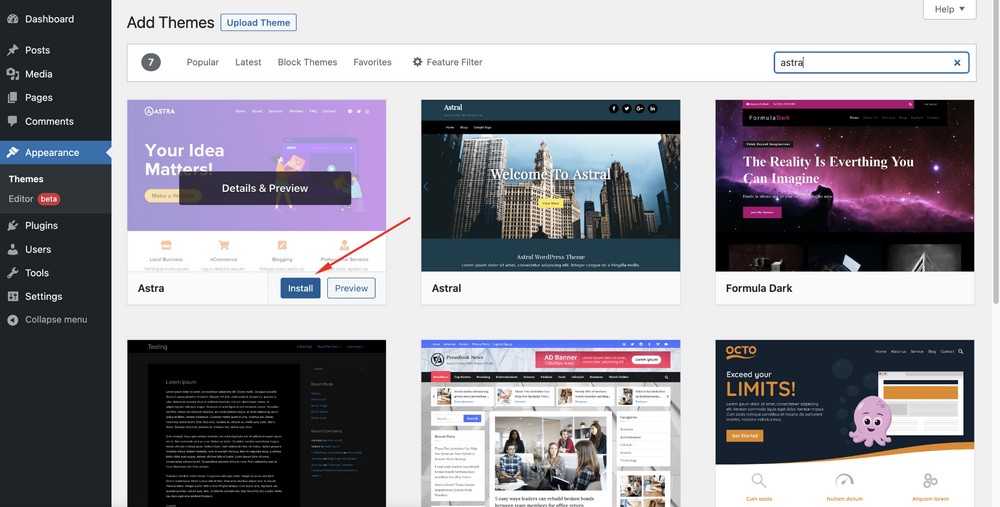
To add Astra from the WordPress dashboard, navigate to Appearance > Themes.
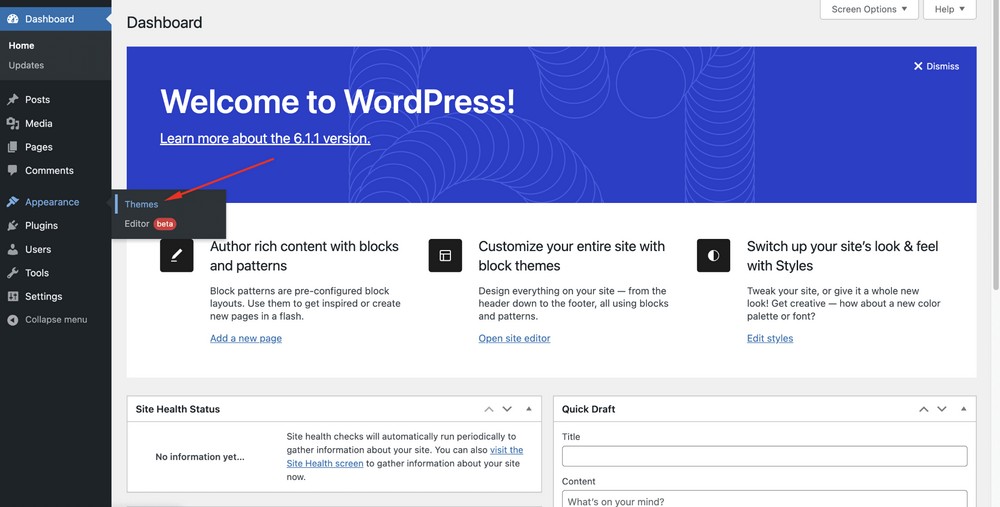
Click on Add New.
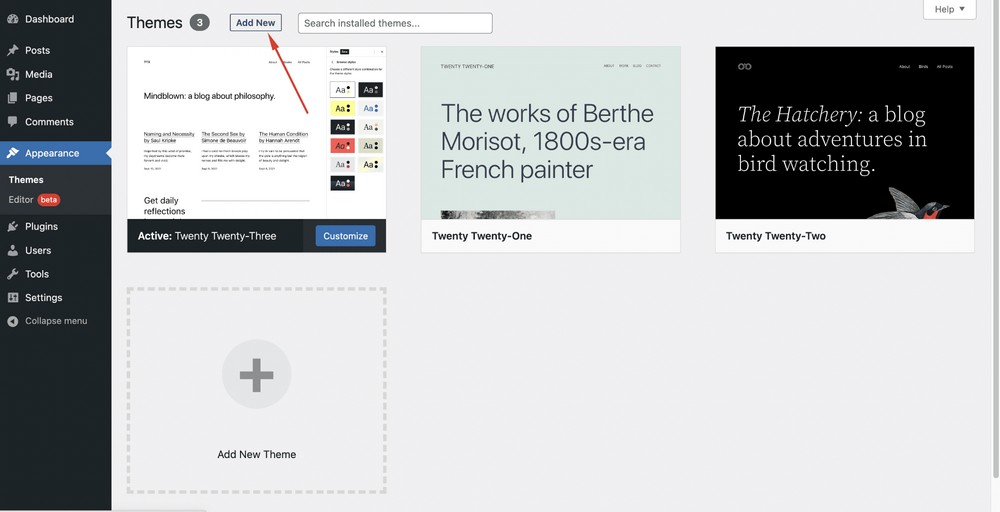
Search for the keyword “astra”.
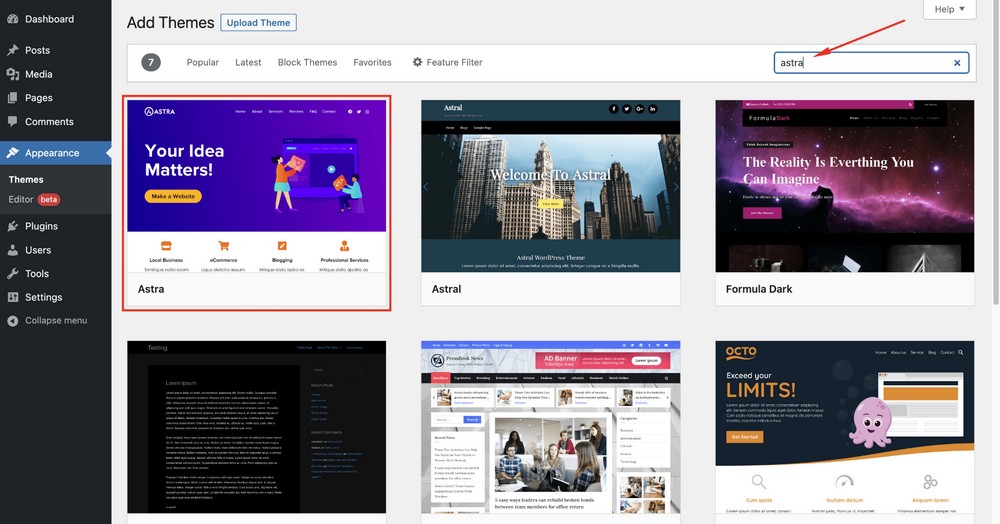
Select the Install button.
Hit the Activate button.
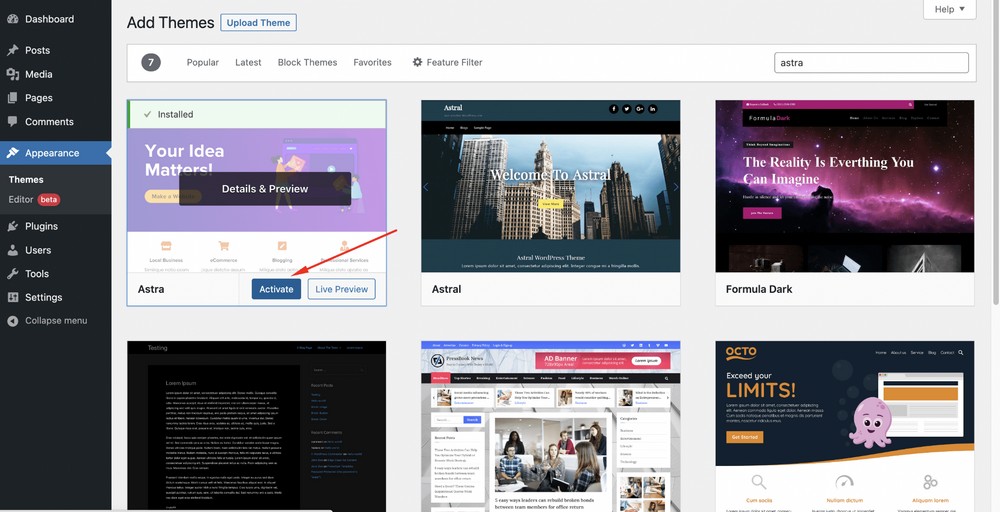
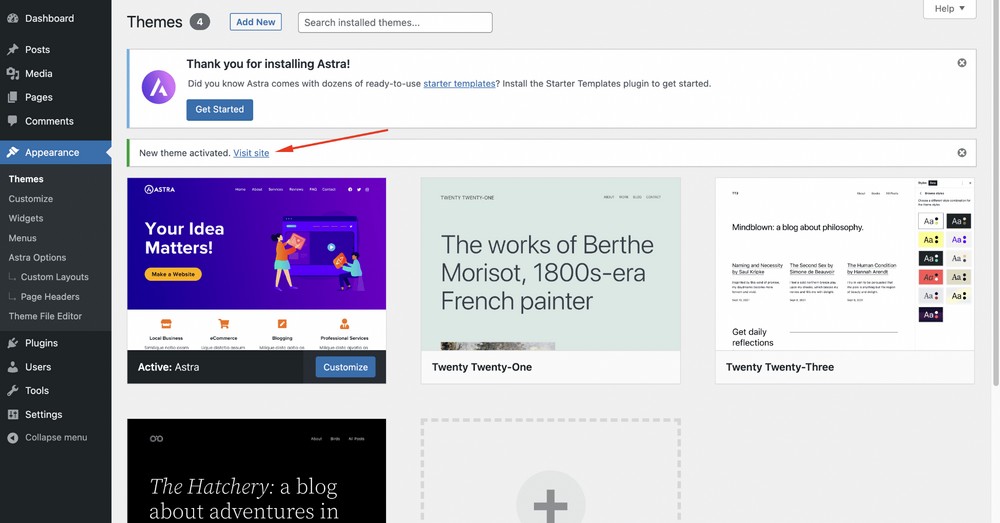
Congratulations, you have successfully installed a WordPress theme!
Now, click on the Visit site link to see how your website looks from the frontend.
Here’s how your new website looks from the frontend.
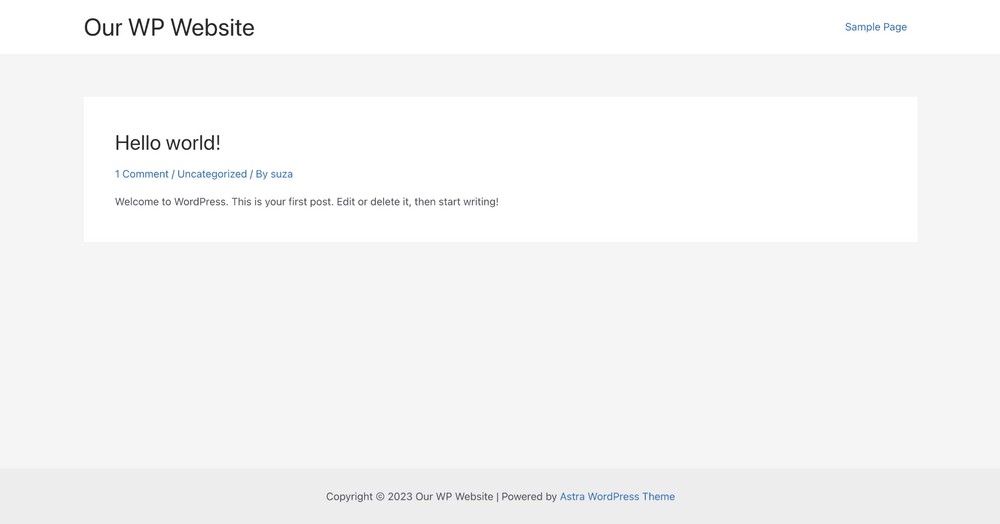
We know the site is blank and it looks dull. So, make sure to follow the next steps to give it a magnificent design.
Step 5: Install Starter Templates
Starter Templates is a plugin for the Astra theme that consists of a range of readymade templates to create a fully functional website.
To install Starter Templates, navigate to the WordPress admin dashboard and head to Plugins > Add New.
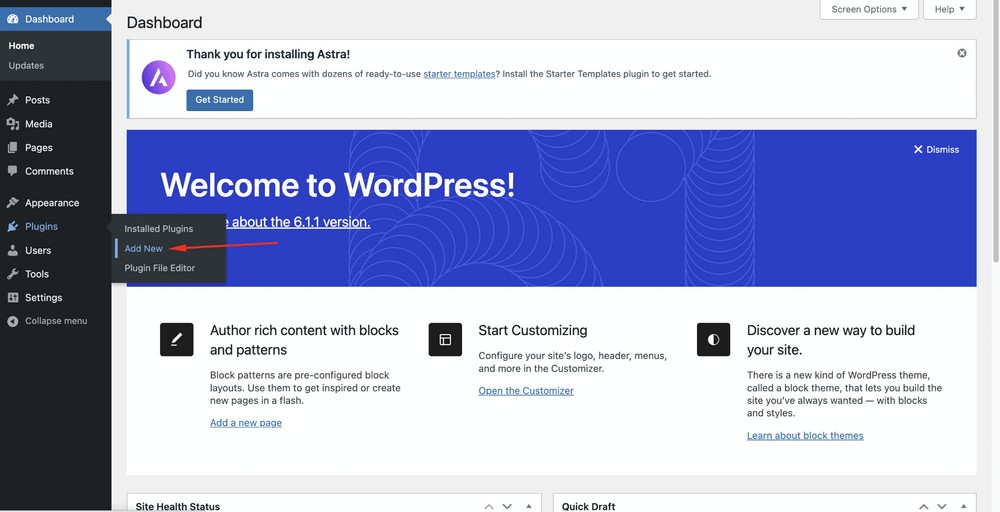
Search for the keyword “starter templates”.
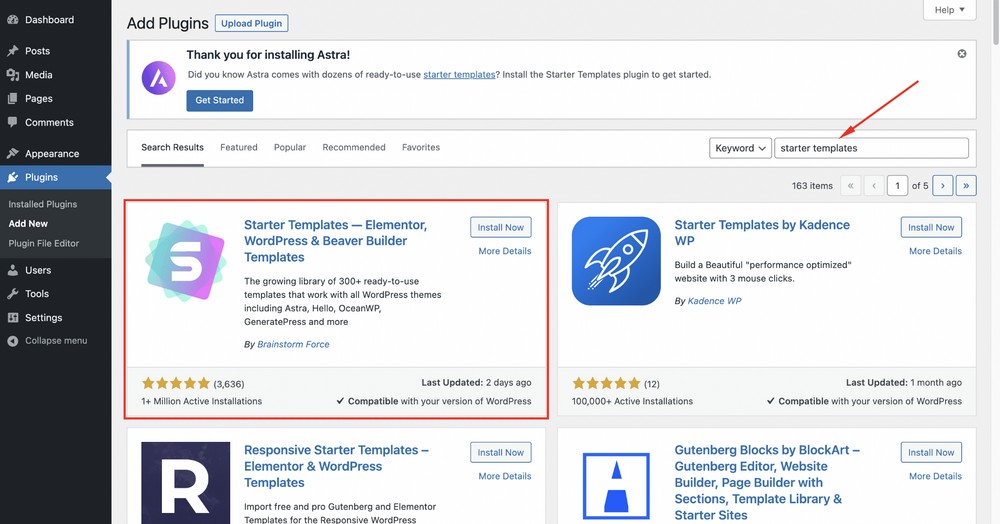
Click on the Install Now button.
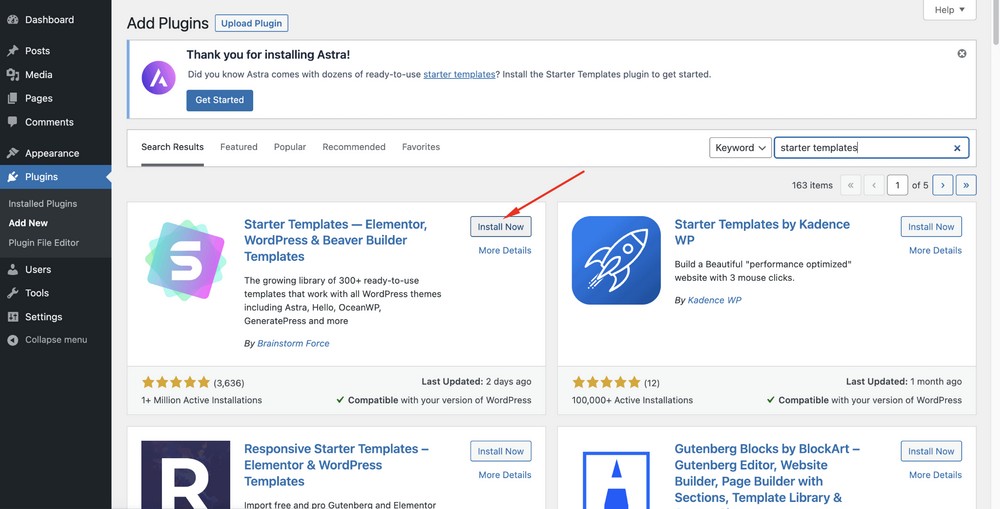
Hit the Activate button.
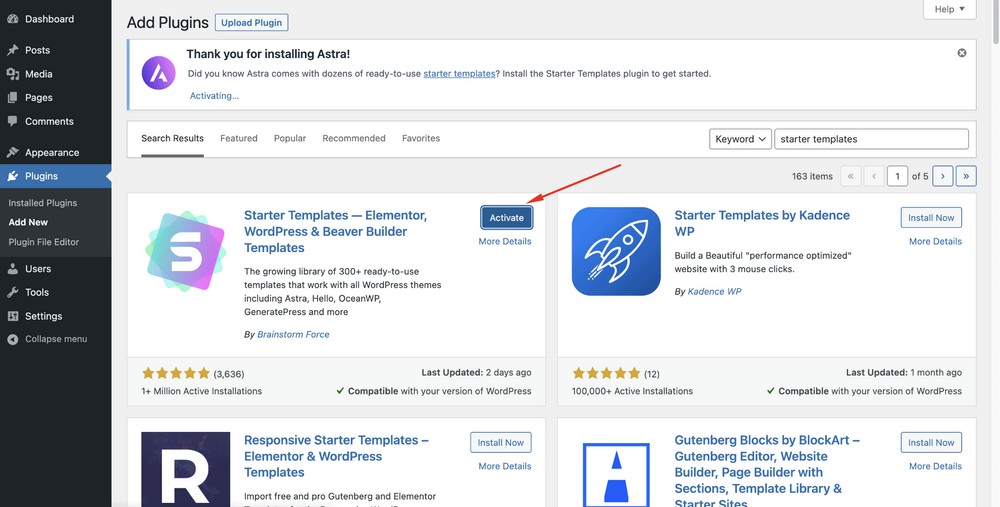
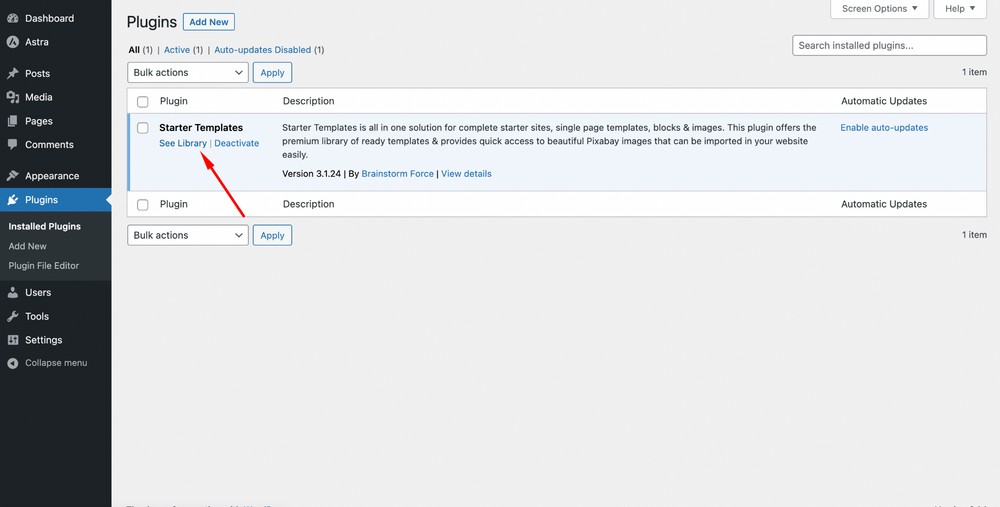
Next, select the See Library option.
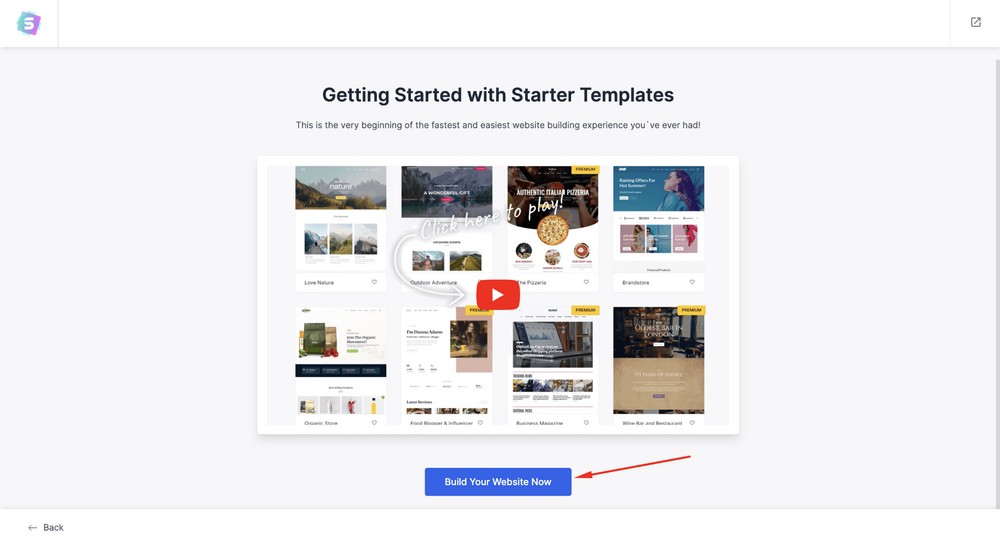
After that, select the Build Your Website Now button.
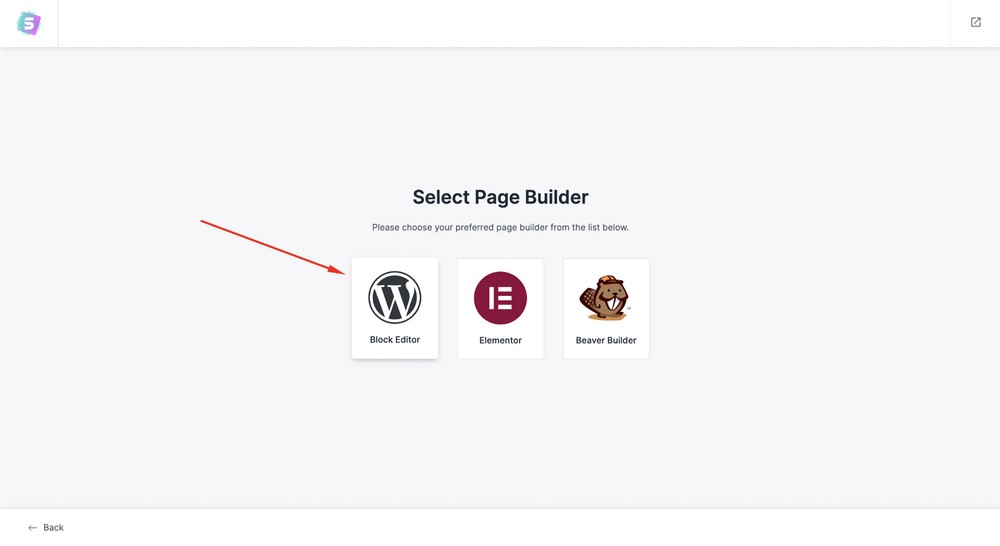
Now you need to choose the page builder you prefer. For this tutorial, we’re selecting Block Editor as that’s what Spectra works with.
On the next page, you’ll find a myriad of templates to choose from. You can literally build any type of website you can imagine.
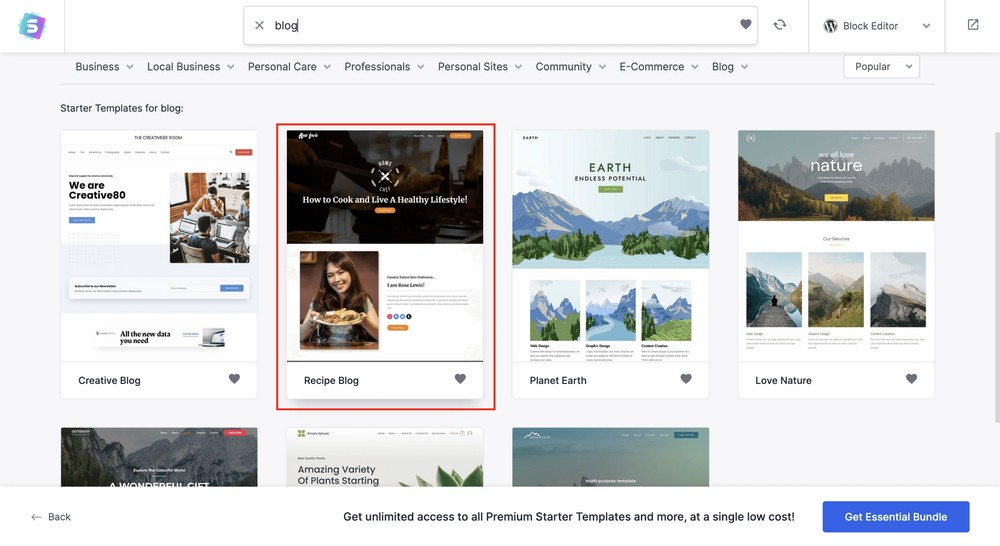
Let’s make a simple website like a personal blog. Type ‘blog’ on the search bar and you’ll see a bunch of readymade templates.
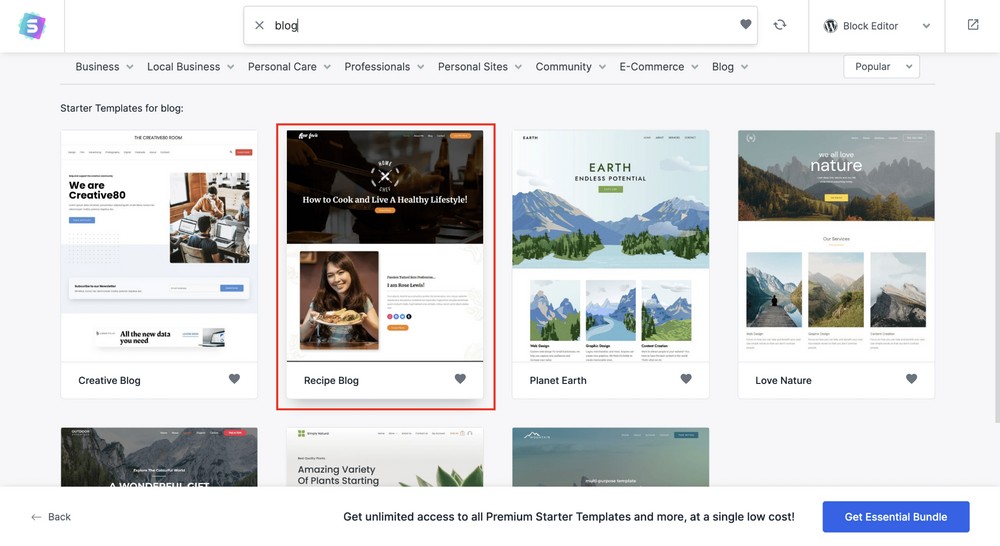
Select the one you prefer. We’re going to select the Recipe Blog by clicking on it.
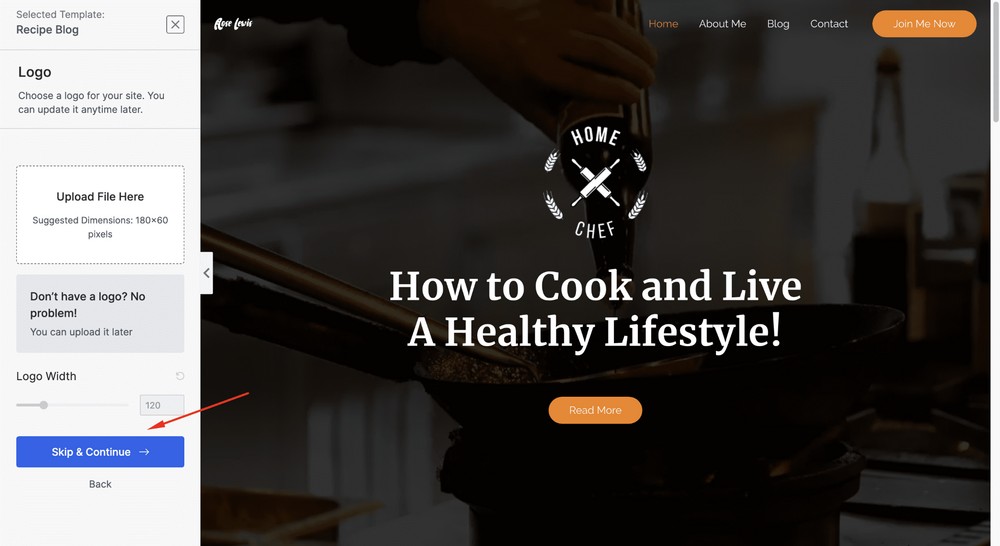
Give the system a second to set up the wizard, then you can upload your website logo. You can also upload it anytime later if you prefer.
Next, click on the Skip & Continue button.
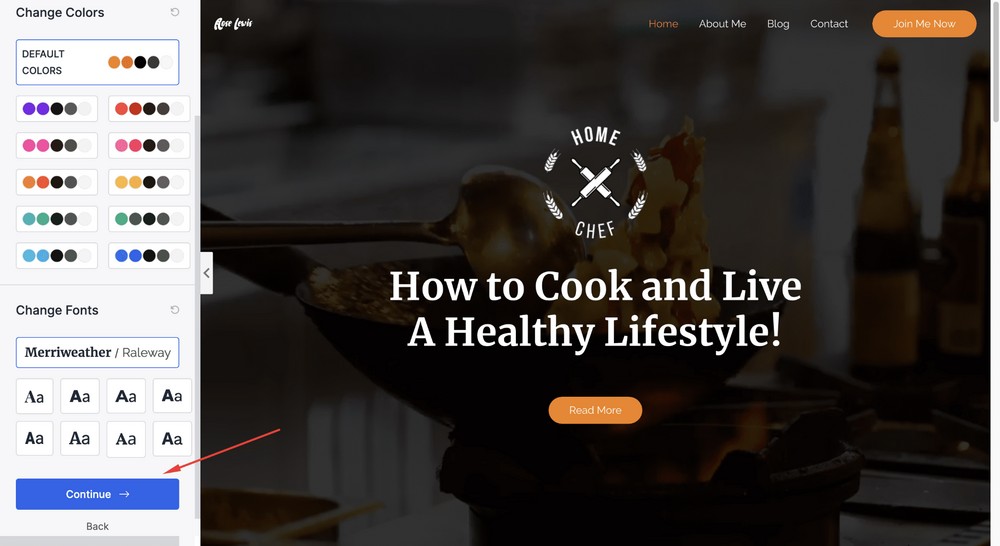
Now, you’ll get options to play around with website color and typography. Once you are done, select the Continue button.
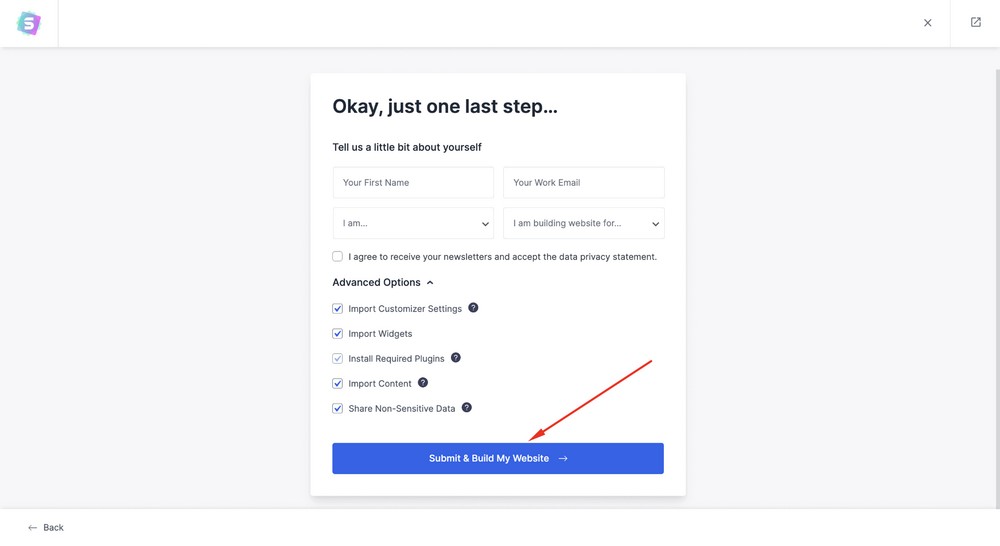
Finally, hit the Submit & Build My Website button to initiate importing all the resources.
You have successfully created your first eCommerce website with WordPress. Nice work!
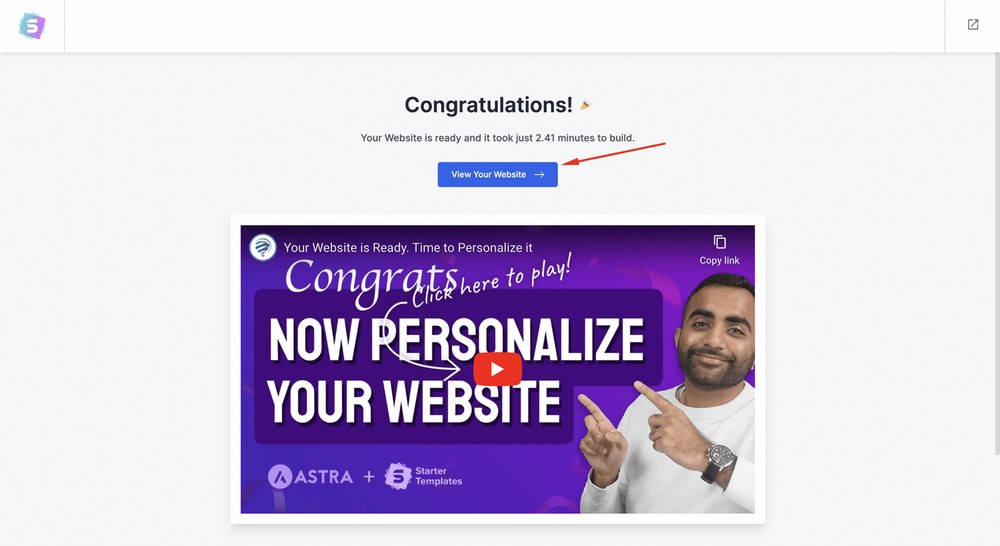
Now, let’s see how shiny your brand new website looks and feels from the frontend. To view it, select the View Your Website button.
Step 6: Customize and personalize your WordPress website
We know everyone has different tastes, so let’s see how we can customize and personalize your WordPress website to suit yours.
Customize your WordPress website with Spectra
Using Spectra to customize your WordPress website allows you to easily and quickly build and design pages or posts without any coding knowledge.
A brief introduction to Spectra
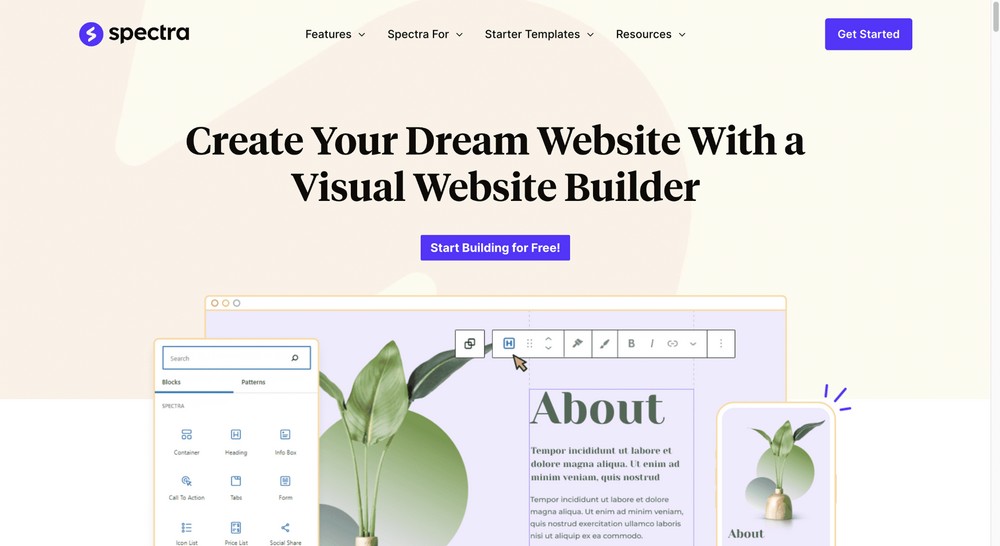
Spectra is a 100% compatible plugin for the WordPress block block editor. It provides powerful blocks to help users build websites quickly and easily.
With Spectra, you can choose from a variety of unique creative blocks that allow you to design pages and posts without any coding knowledge.
The plugin also has an easy to use interface and various customization options to make the process of building pages and websites even more intuitive.
In addition, it offers 20+ pre-built, readymade templates you can import with just a few clicks and customize them to create professional websites.
These starter sites cover a range of niches, including local businesses, restaurants, agencies, online stores and blogs.
Let’s add a counter and testimonial on the home page
When you select the block editor while installing Starter Templates, the Spectra plugin is automatically installed.
So, we’re skipping the manual installation process.
Now, let’s edit the homepage and add a counter and some testimonials.
A counter can help increase engagement by showing visitors how many followers you have or products you feature.
Testimonials are always useful on websites to help build trust.
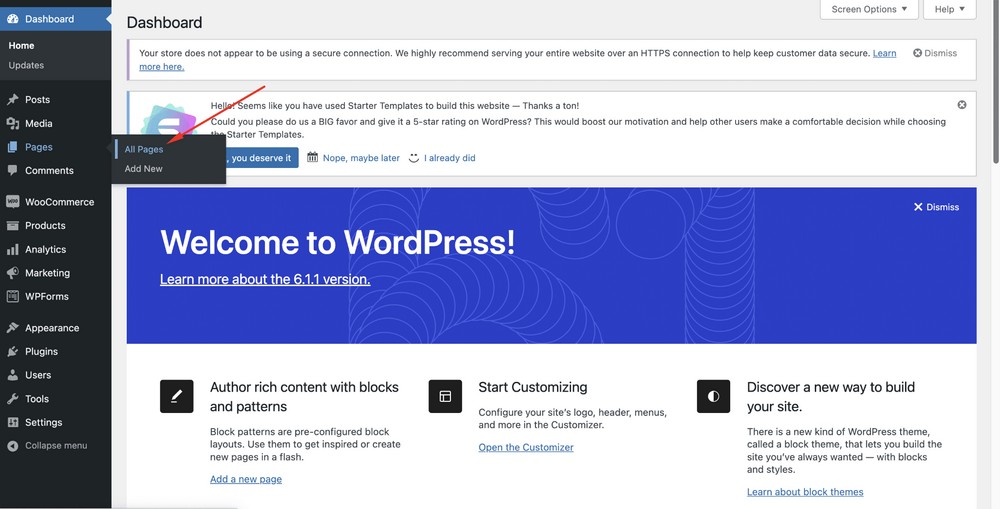
Navigate to the WordPress admin dashboard and then go to Pages > All Pages.
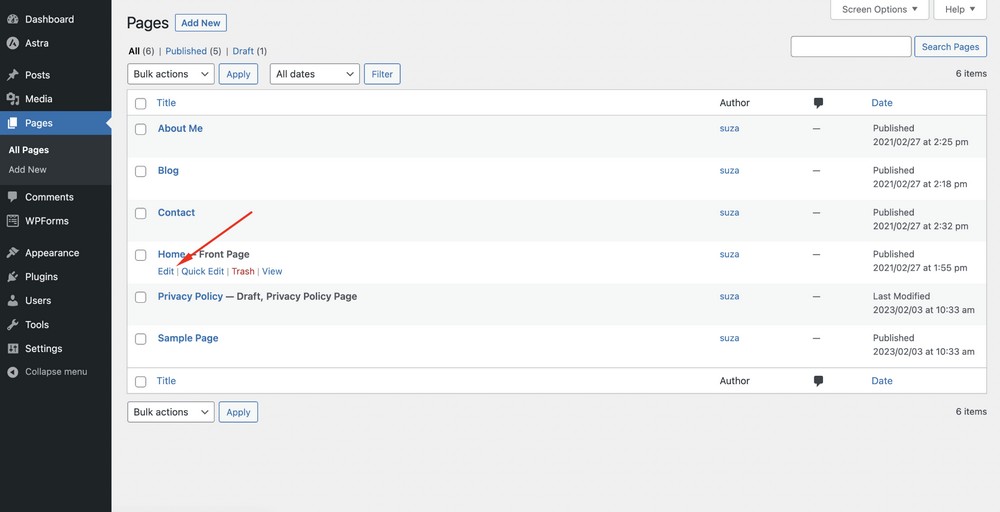
Select the Edit option.
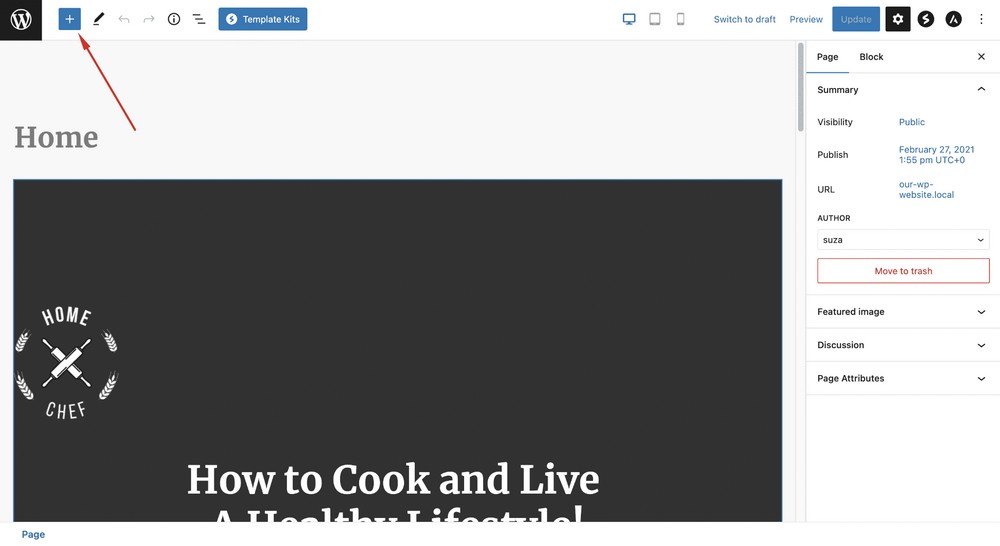
The page will open with the default WordPress block editor.
Click on the plus (+) icon to take a container.
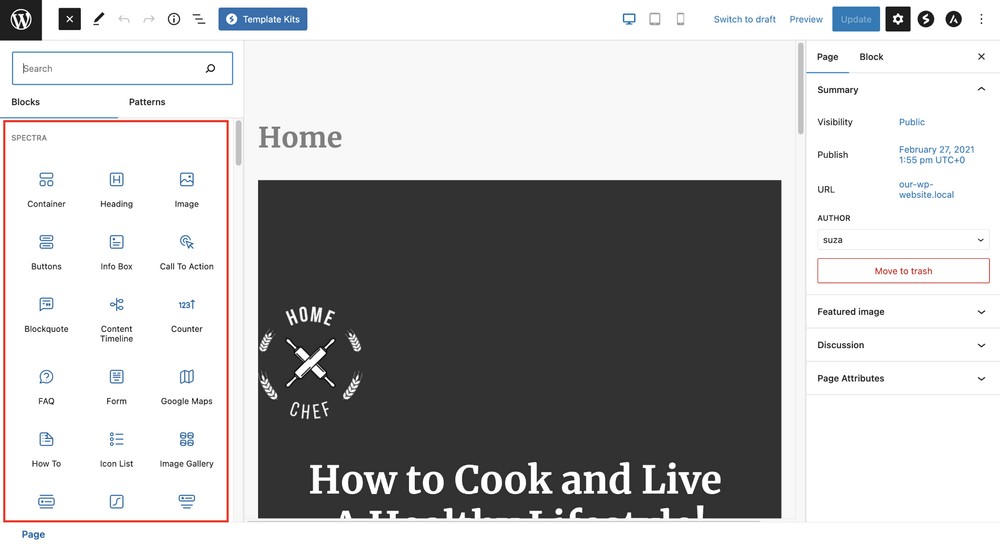
Next, you’ll be able to see the Spectra blocks on the left side of the screen.
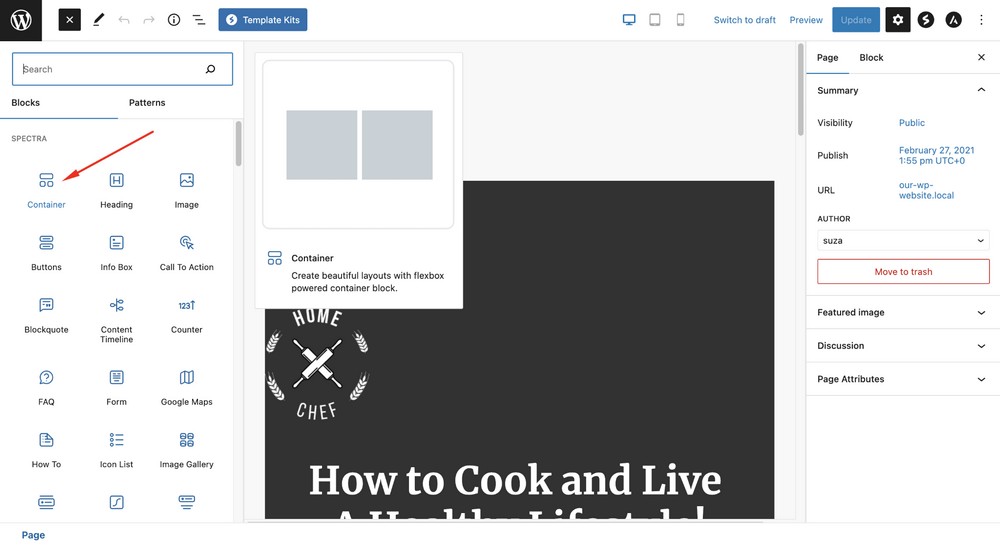
Select the Container block to take a new section.
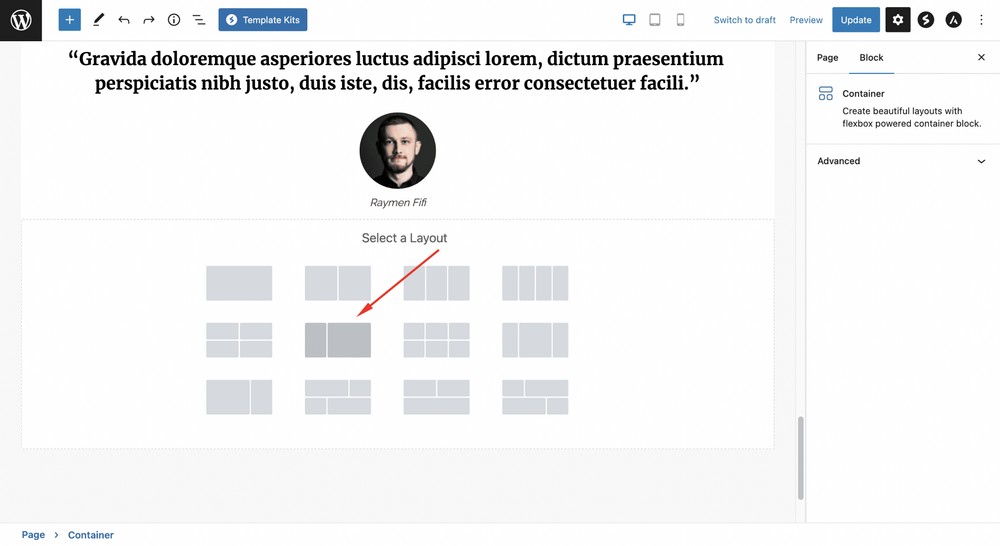
Pick a container style.
Click on the plus icon to add a new block.
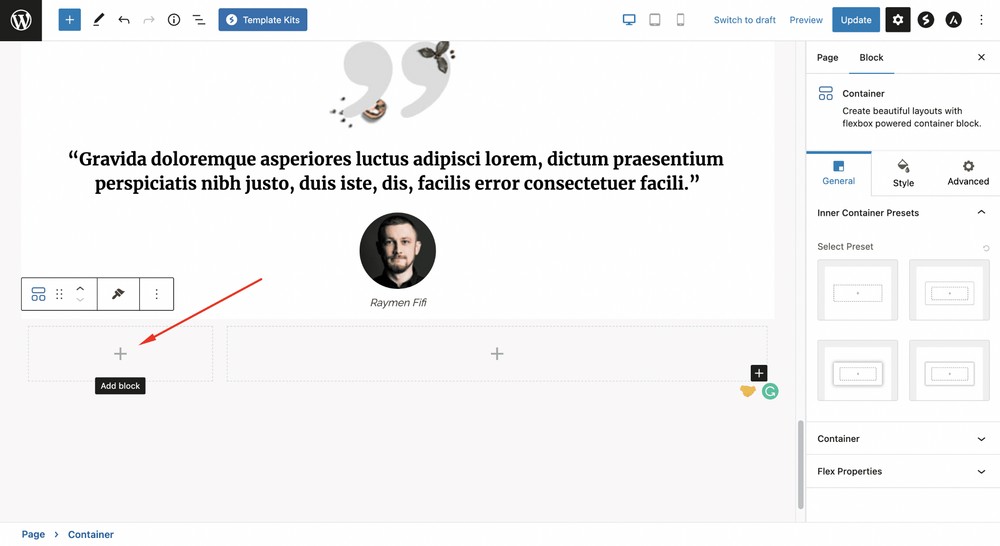
Select the Counter block.
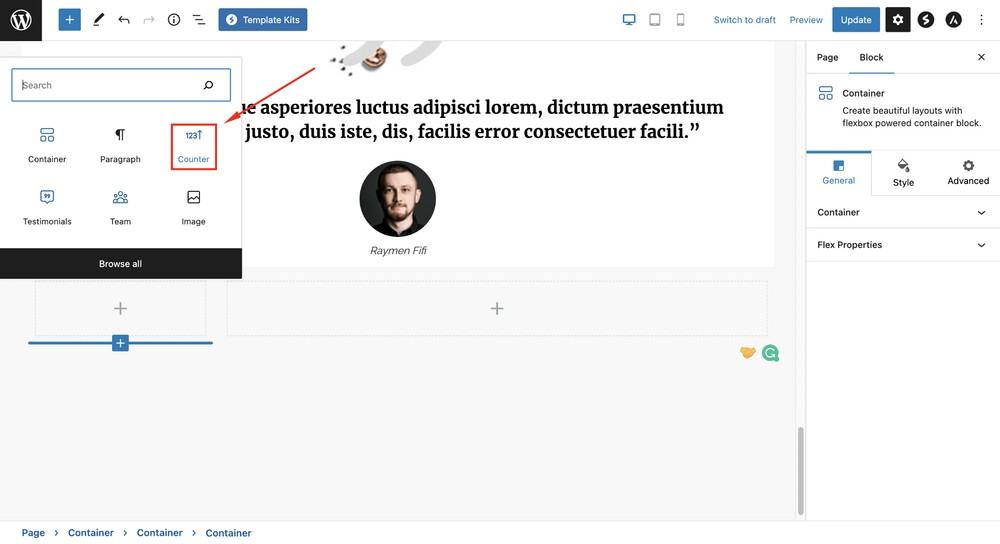
The Counter block should appear inside your container.
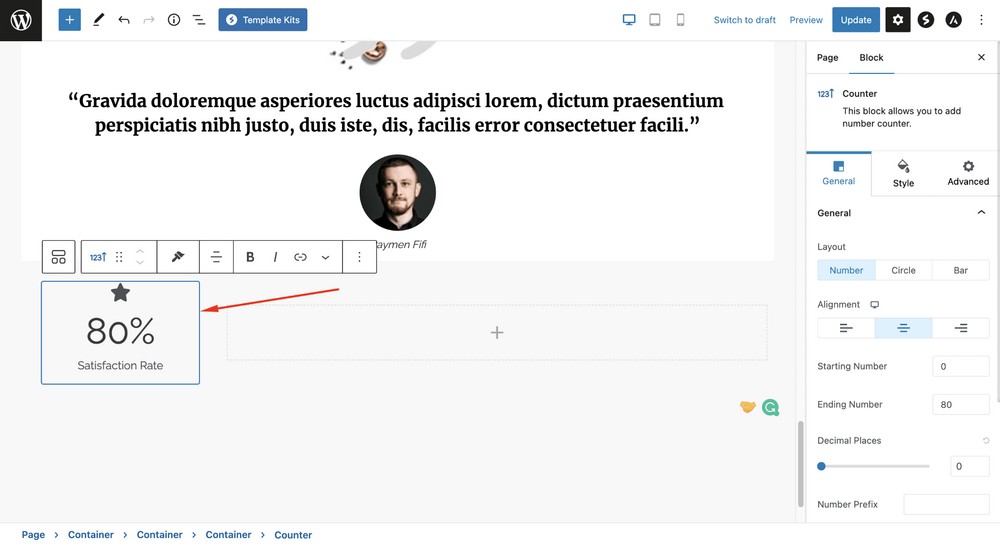
Now, select the plus icon to add a testimonial block.
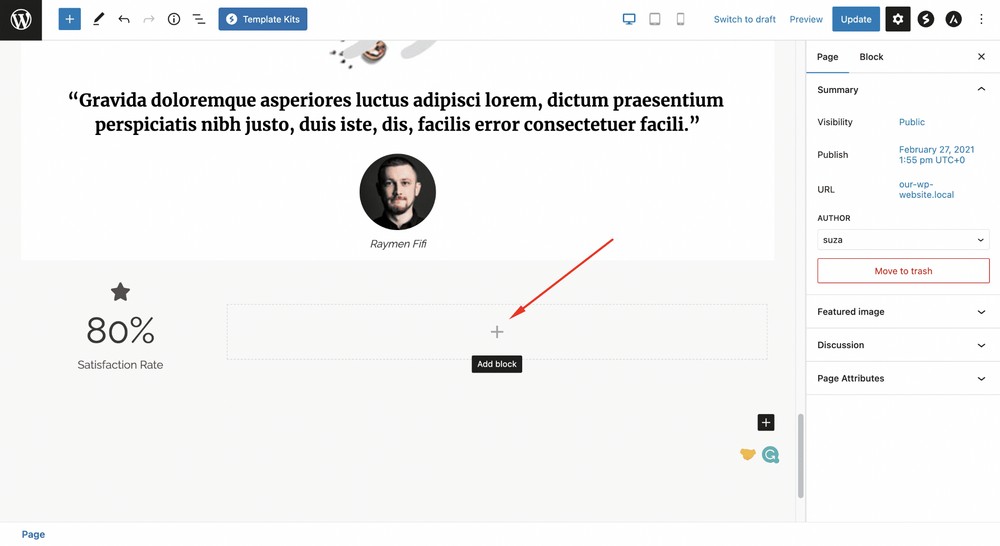
Search for ‘testimonial’.
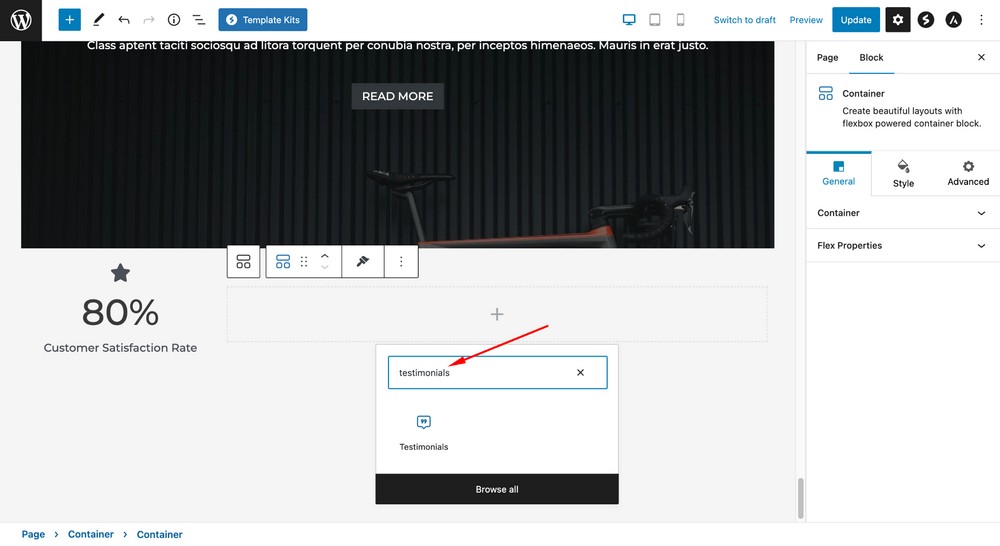
Select the Testimonials block to place it on the page.
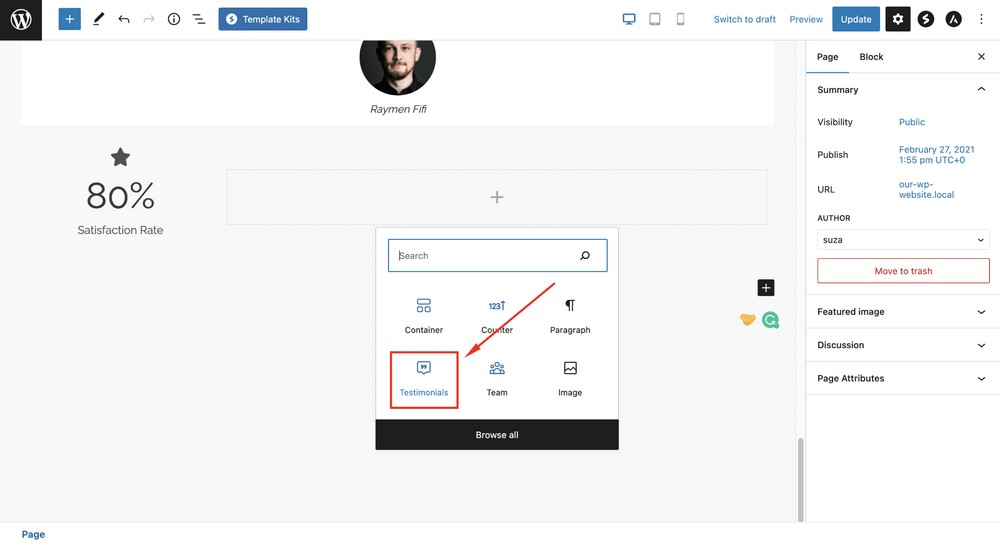
Let’s add an image from the Image menu.
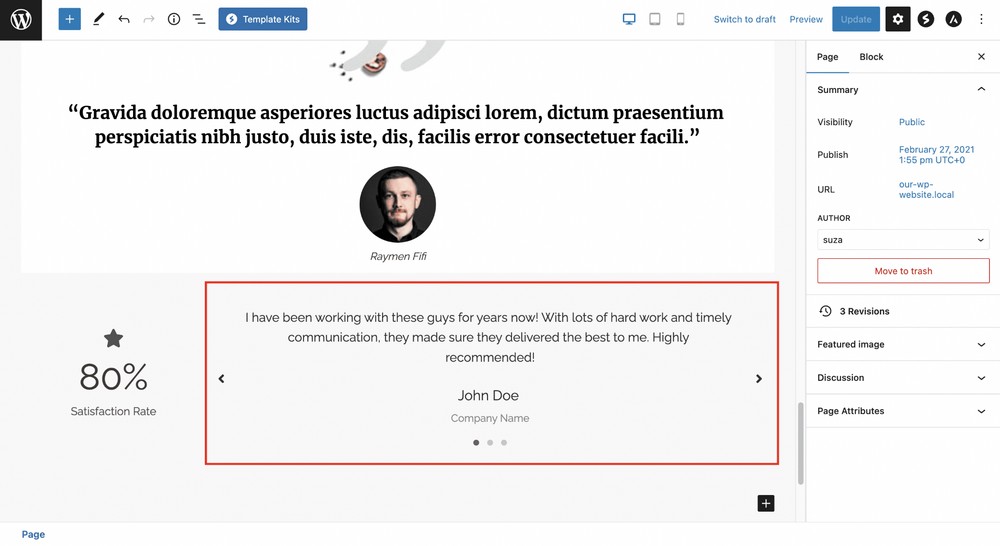
That’s how easy it is to customize your website with Spectra blocks. You can also customize the individual blocks as you wish.
Here’s a quick video showing you how easy it is to edit a Spectra block.
Updating common WordPress settings
Now you’ve made all the front end changes like we talked about in the last section, let’s go over a few more settings that you need to take care of.
You’ll need to update some general settings, writing settings, reading settings, discussion settings, permalinks, and privacy settings.
Let’s go through each of these and learn how to make the necessary changes.
General settings
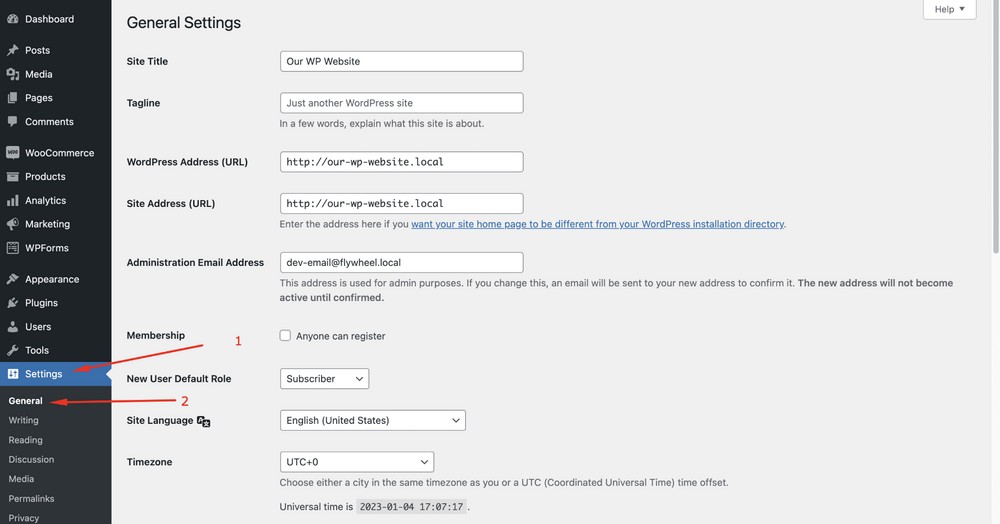
The General section in WordPress allows you to manage a range of basic settings for your website.
These settings include:
- Site Title: The title of your website, which is displayed in the browser’s title bar and as the main heading on your homepage.
- Tagline: A brief phrase that describes your website or business. This is displayed under the site title on the homepage.
- Website Address (URL): The main address of your website, which is used to access it in a web browser.
- Email Address: The email address you use to login to your website as an admin and where WordPress will send alerts.
- Timezone: The timezone in which your website is located, which is used to determine the correct time for scheduling posts and other tasks.
- Date Format: The format in which dates are displayed on your website.
- Time Format: The format in which times are displayed on your website.
- Week Start Day: The day of the week that you want to be displayed as the start of the week in calendars and other date-based features on your website.
These are the main settings found in the General section. There may be additional options depending on your WordPress version and the themes and plugins you have installed.
Writing settings
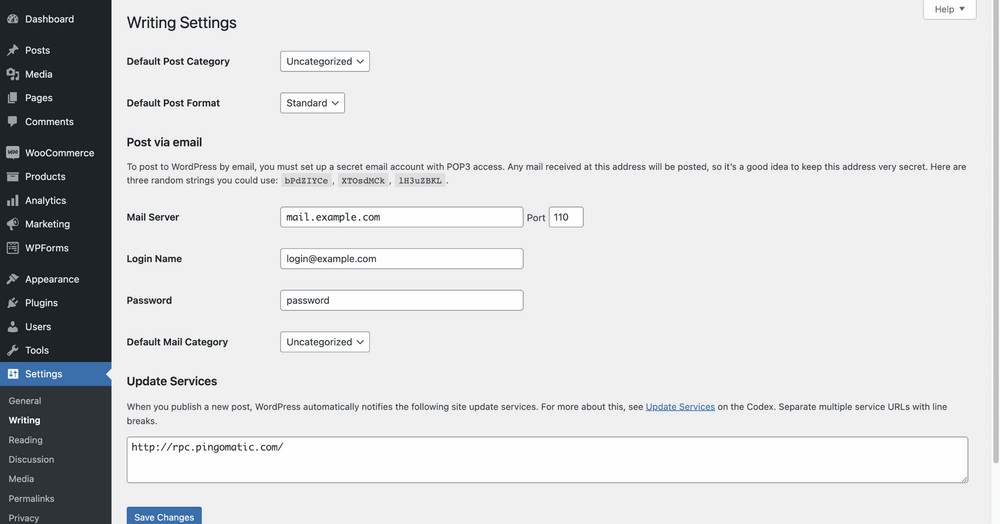
In the Writing section, you’ll see the default settings for the Default Post Category and Default Post Format.
It is not necessary to modify these settings during the initial setup of your WordPress website, but you may need to change them at some point in the future.
As you begin creating blog posts, you have the ability to update the format type.
Reading settings
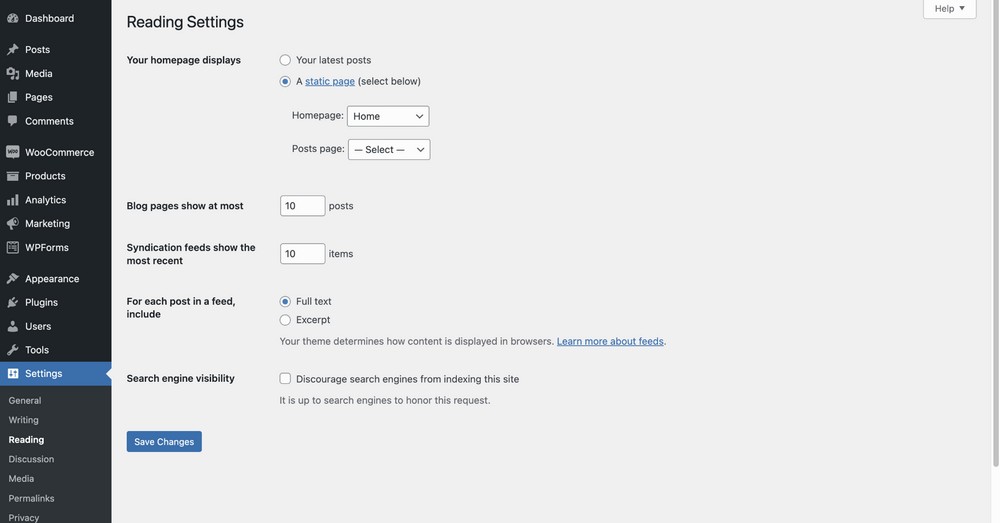
The Reading section allows you to configure the display of all your posts or pages, which is what your readers will see when they visit your website.
You can select the content you want to appear on the homepage upon a visitor’s initial visit, such as a specific page, blog posts, or the homepage itself.
You have the option to adjust these settings now, but for the current session, you can leave them unchanged.
Permalink settings
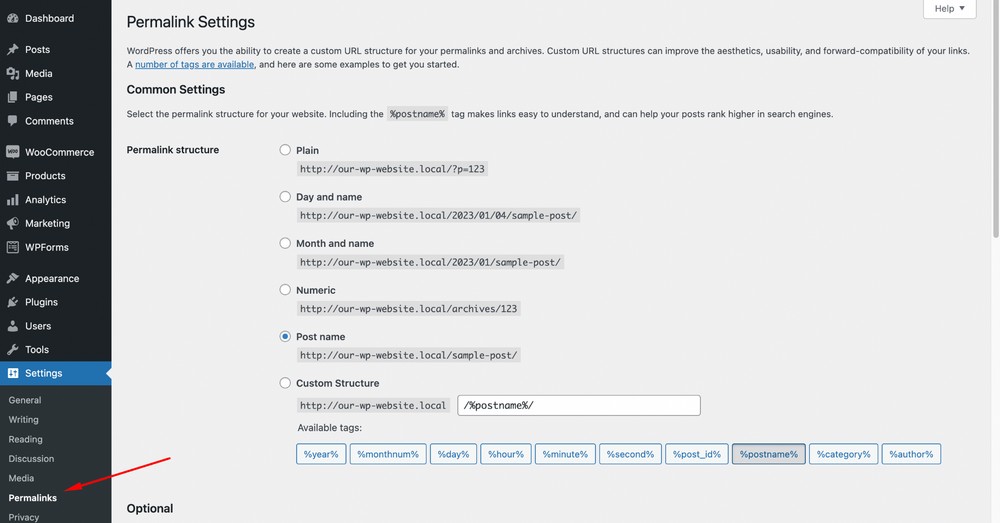
You can use Permalinks, which are permanent URL structures for your webpages (including pages and posts), to create a clear and concise structure for your content.
By setting up a clear and concise permalink structure you can make it easier for users and search engines to find web pages.
In the Permalink Settings section of your WordPress website, you can choose the format of your permalinks.
The default option is the Plain setting, which uses the post ID to create the URL. However, there are several other options available, including:
- Day and Name: This option creates the permalink using the date and post name, such as “https://example.com/2022/01/01/post-name/”.
- Month and Name: This option creates the permalink using the month and post name, such as “https://example.com/2022/01/post-name/”.
- Numeric: This option creates the permalink using the post ID and post name, such as “https://example.com/archives/123/post-name/”.
- Post Name: This option creates the permalink using only the post name, such as “https://example.com/post-name/”.
You can change the permalink structure at any time, but be aware that doing so can affect the URL of your existing content and create broken links.
We recommend using the Post Name permalink structure and avoid changing it unless absolutely necessary.
Discussion settings
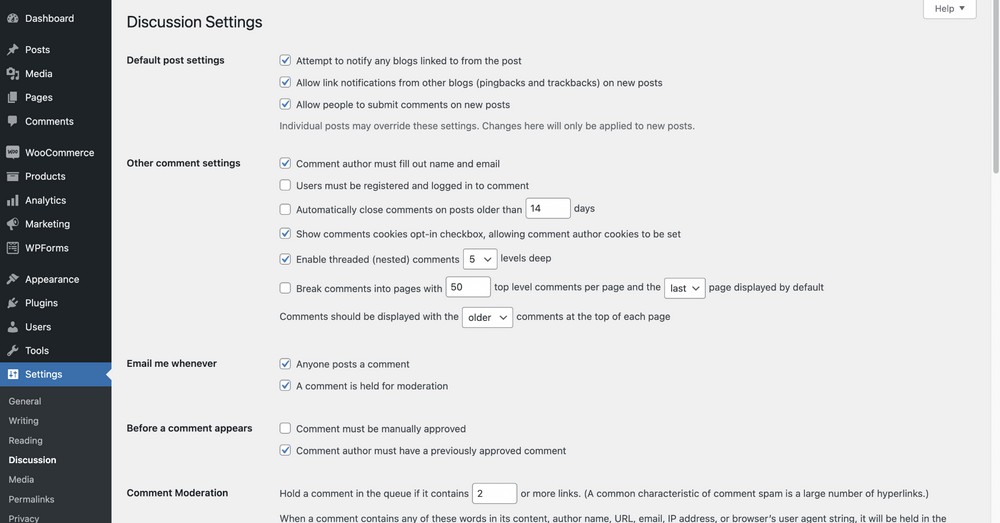
Approximately 20% of the content on WordPress sites originates from the comments section, which is where readers can interact with your articles, pages, and posts.
Comments serve as a useful communication tool with readers and is typically kept enabled on websites.
Discussion settings allow you to customize the display and moderation of comments. For this session, let’s leave the settings as it is.
And yes, you definitely have the option to modify these settings in the future if necessary!
Privacy settings
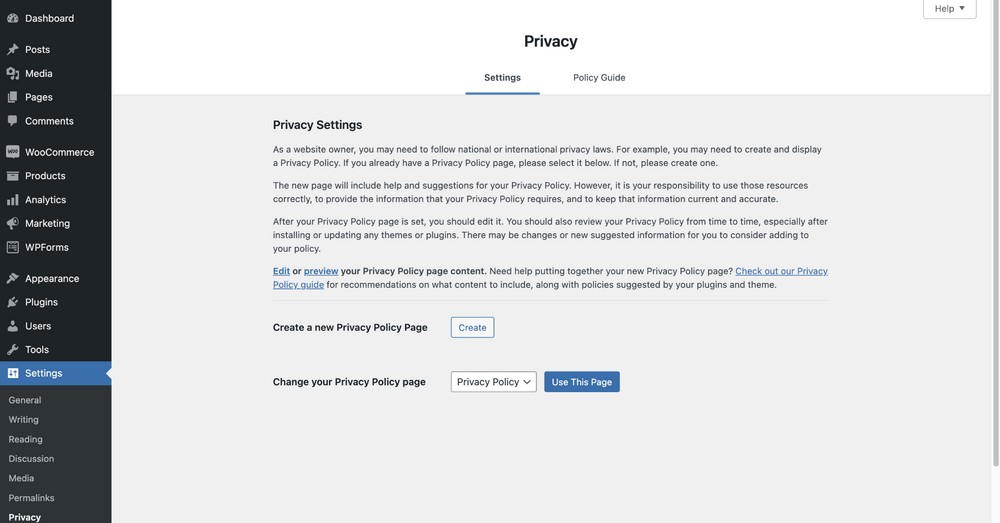
Privacy is an important consideration and we advise you to address it from the very outset to avoid potential issues.
WordPress offers a default template for addressing privacy issues.
To access this template, go to your WordPress dashboard and navigate to Settings > Privacy > Select the Edit option to customize the privacy policy.
You can create a custom privacy page and set it from the Change your Privacy Policy page option or use the default.
Updating menus on your WordPress website
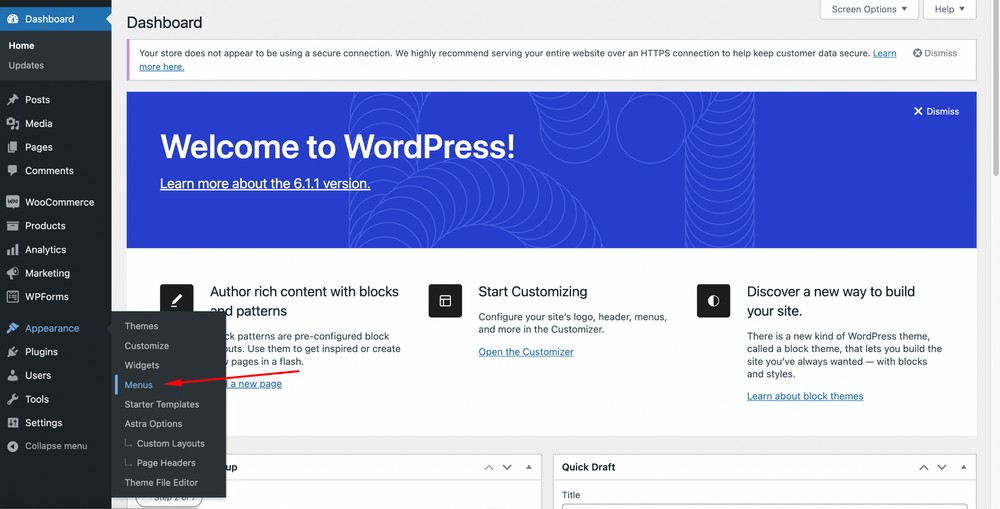
To update the menu on your WordPress website, go to the WordPress admin dashboard and click on the Appearance > Menus option.
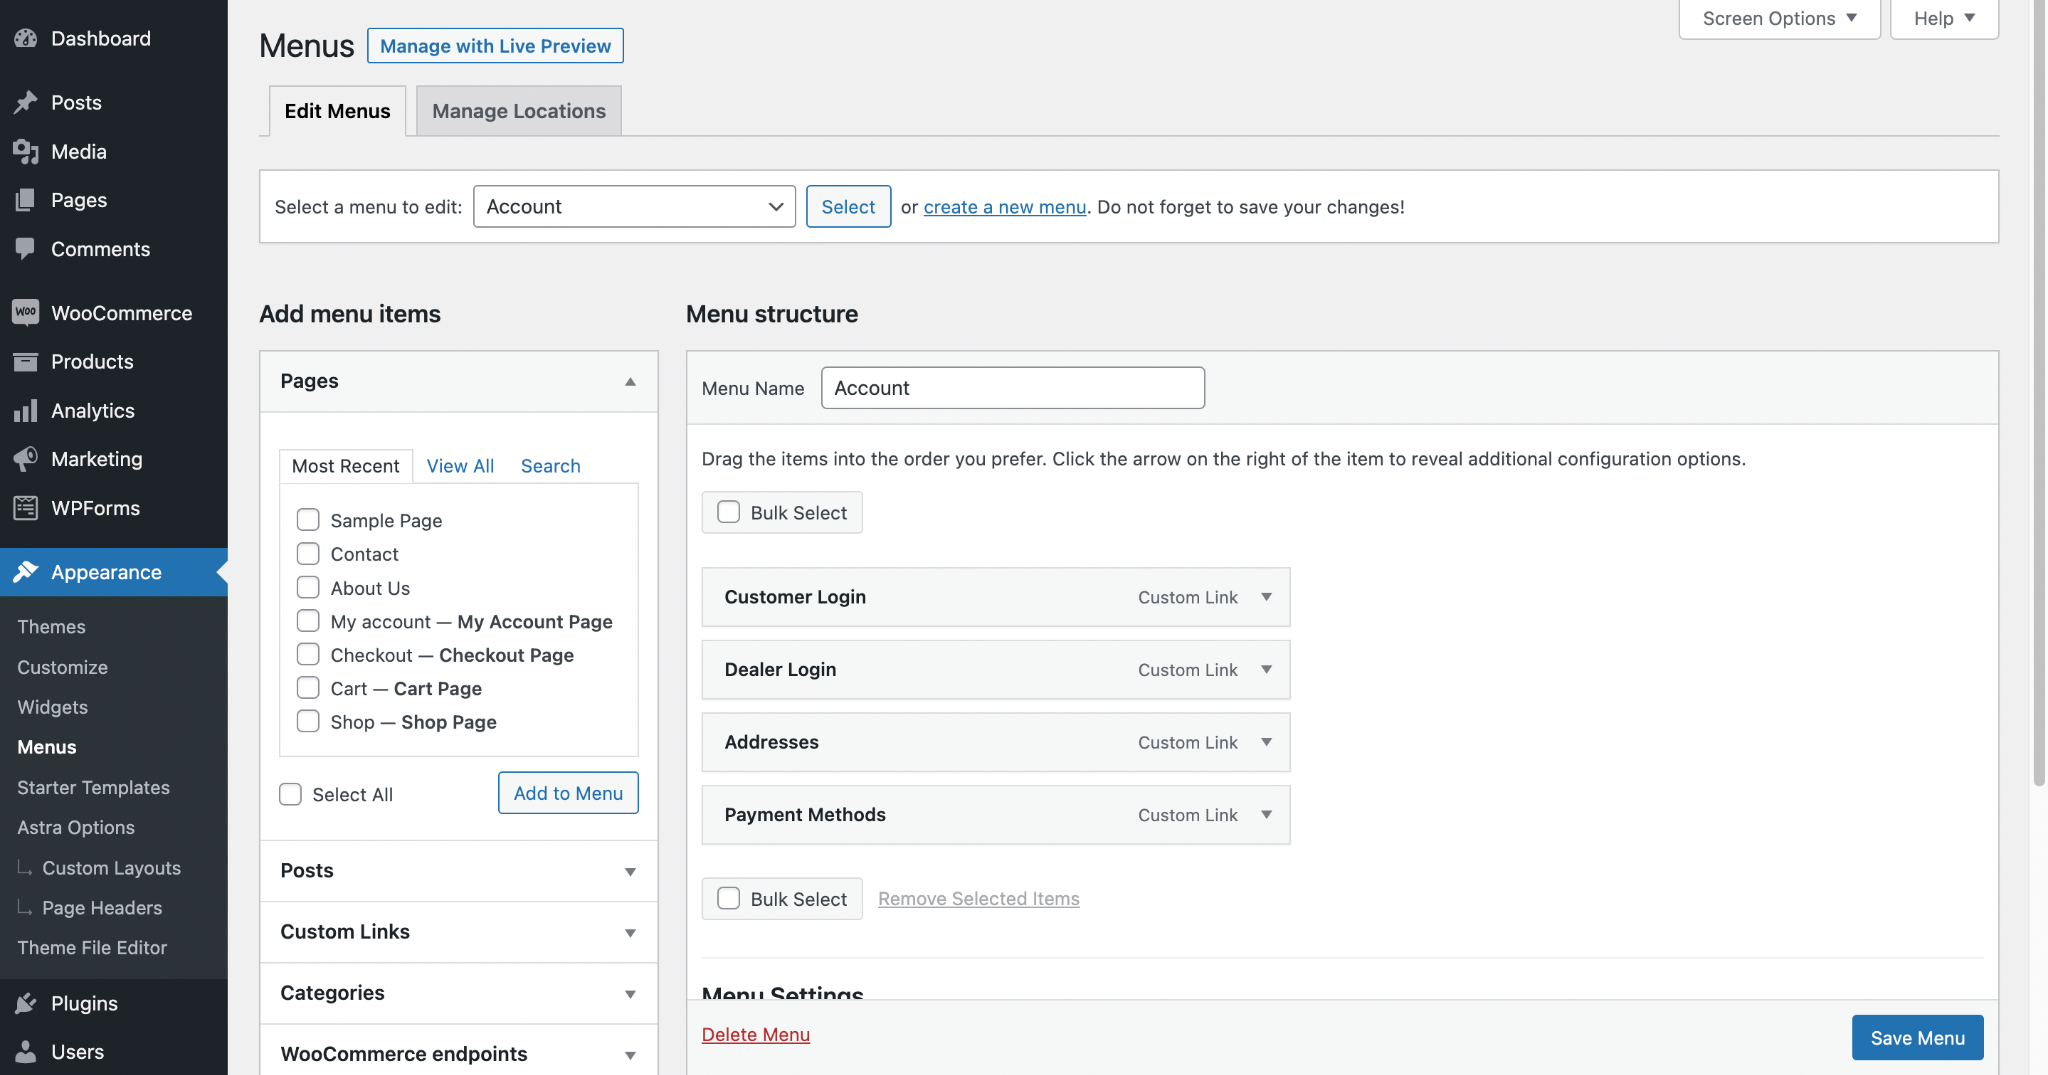
In the Menu Structure section on the right, you will see a list of the pages, posts, and custom links that are currently included in the menu.
To add a new item to the menu, check the items in the Pages box and click on the Add to Menu button.
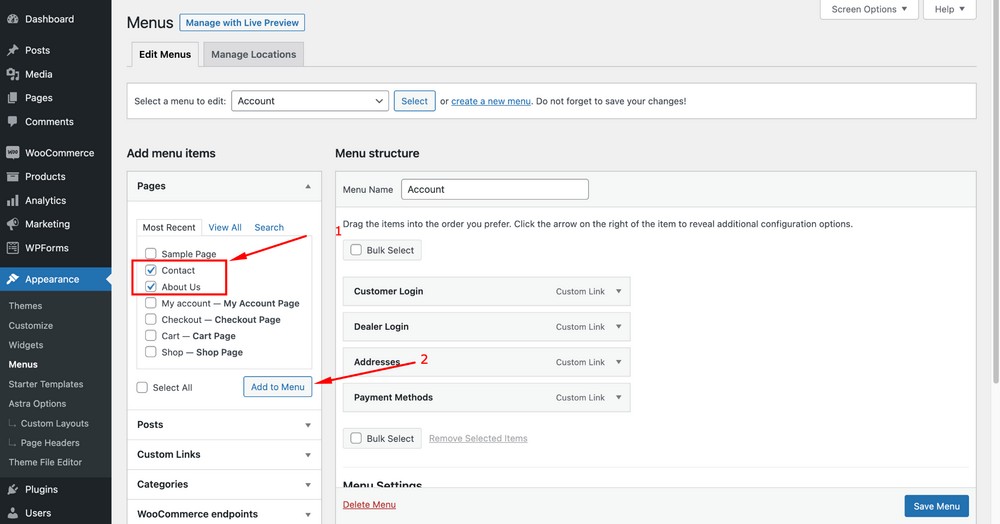
After adding the menu items feel free to rearrange the menu items from the Menu structure section.
When you have finished making your changes, click the Save Menu button.
If you have multiple menus on your website, you can select the desired menu from the Menu Settings section at the bottom of the page before making your changes.
What is the difference between a page and a post?
There are differences between pages and posts in terms of their purpose and how they are displayed on a website.
Posts are timely and typically include a date and a public author, while pages contain static, timeless content and do not display a public author or date.
The decision to include a blog with posts depends on the needs of your business.
Every website should have a few basic pages such as a homepage, an about us page, a contact us page and a privacy policy page.
Exactly what pages you have will depend largely on the type of website you’re building. Just know that you can add or remove pages and posts whenever you like.
Quick tips:
You can add a post from WordPress admin dashboard > Posts > Add New.
To add a page go to Pages > Add New.
How to optimize your WordPress website

As your website grows and attracts more visitors, it’s important to optimize its performance to ensure a smooth and enjoyable experience. Assistance from a website design company can be invaluable in this process.
There are a number of ways to optimize a WordPress website, including optimizing images, minifying CSS and JavaScript files, and using caching plugins.
In this section, we will discuss some best practices for optimizing your WordPress website to improve its speed and performance.
SEO optimization

To get organic traffic, you need SEO (Search Engine Optimization) to help you be indexed and ranked by search engines.
Here’re a few ways you can optimize your WordPress website for SEO:
- Choose an SEO optimized theme: The first step is to choose a theme that is optimized for SEO. Your theme should have clean code, as well as fast loading times.
- Optimize your website’s load time: Slow page load times can drive visitors away. Use tools like GTmetrix to see how long your website takes to load and make changes to improve your website’s speed.
- Make sure your website is mobile-friendly: People are turning into mobile devices more than ever. Your website needs to work perfectly on mobile devices like smartphones and tablets.
- Get the most out of SEO tools: Finally, you should make sure to submit your website to Google Search Console and use tools like Yoast SEO or RankMath to help optimize your website and improve its ranking on search engines.
- Use a lazy load plugin: Lazy load plugins only load content as it is needed, which can help reduce the load time of your pages.
Content optimization
Content is a part and parcel of a website since you need to share your messages through it.
High quality content also helps your website rank in the Search Engine Result Pages (SERPs).
Some of the best content optimization strategies include:
- Use relevant and targeted keywords in your content: Choose keywords that accurately reflect the content on your website and use them in a natural way throughout pages and posts.
- Keep the content concise yet comprehensive: Be to the point. Try to explain your point fully using fewer words. Don’t use any fluffy, unnecessary words. Use an AI summarizer to craft a piece of writing that is concise and gets a better ranking.
- Write compelling and engaging titles and headings: Use headings and subheadings to break up your content and make it easier to read. Use descriptive, actionable and interesting titles that will grab your readers’ attention.
- Use images and other media to supplement your content: Add images, videos, and other media to help to break up long blocks of text and make your content more visually appealing. Just be sure to use descriptive and relevant file names for your media files.
- Use internal linking: Linking to other sources from a page helps your website to reduce bounce rate and other SEO benefits.
- Maintain content hierarchy: You should also use headings and subheadings to organize your content, and include relevant keywords throughout your website.
Tips to create different types of websites
In this section, let’s take a look at some tips for creating different types of websites.
How to create an eCommerce website
If you want to sell your product or services, you need to create an eCommerce website.
A typical eCommerce website looks like this:
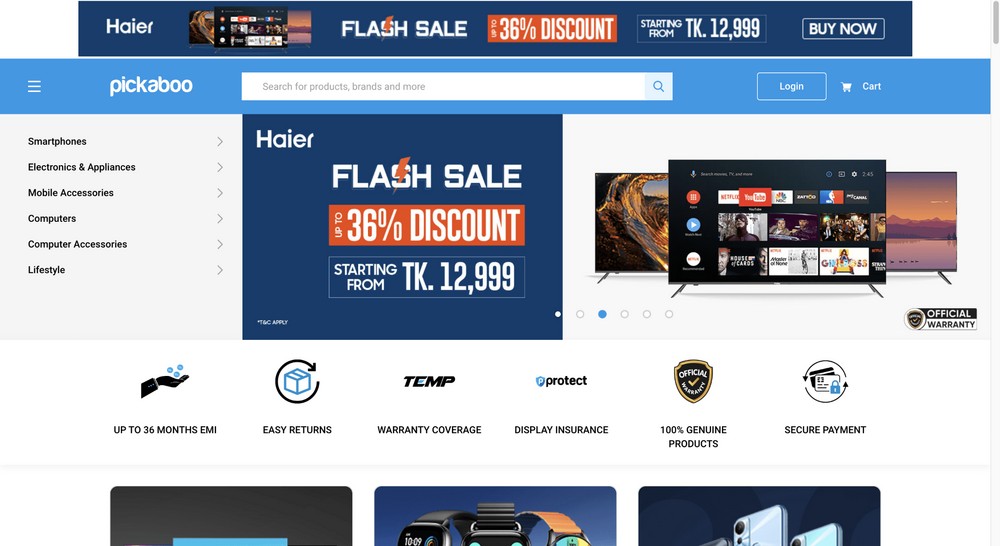
Basic functionalities of an eCommerce website include:
- An SSL certificate, as you need to encrypt user data to provide security and privacy for customers.
- A good user interface so that customers can choose product variations like colors, sizes and quantities.
- Add to favorites so that users can save their preferred items to buy them later.
- Precise shipping options and automatic shipping cost calculations.
- Live support or other forms of customer support is essential if anything goes wrong while your customers are paying for their transactions.
To create an eCommerce website, you need to install an eCommerce plugin like WooCommerce or SureCart.
If you want to sell physical products WooCommerce will be a great solution. To sell digital products you can try SureCart. Non-WordPress users might consider SureCart, headless Magento as alternatives.
How to create a membership website
If you want to sell subscriptions, you need to create a membership website so you can take payments on a recurring basis.
Plugins to use:
- You can use a membership plugin like SureMembers, MemberPress, LifterLMS or Paid Memberships Pro to create your membership website.
Here’s an example of a membership website.
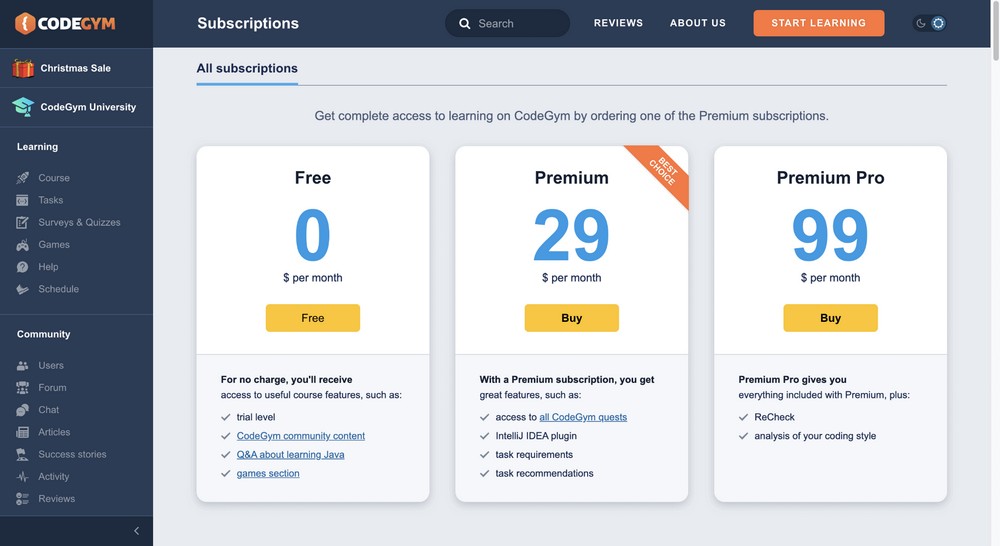
What are the basic functionalities of a membership website?
- The ability to provide access to content or resources in exchange for a subscription.
- Ability to drip feed or schedule content.
- Members should have a way to log in to their dashboard and see their subscription status.
- Members should have a good way of processing their payments.
- They receive notifications about new content and updates on your site.
How to create a personal website?
Personal websites include professional details or a blog where you can write your thoughts.
Plugins to use a personal website:
- You can use plugins like WPForms, Ninja Forms or Fluent Forms to create a contact form.
Here’s an example of a personal website:

What are the basic functionalities of a personal website?
- Contact section, blog posts, portfolio items, and other information.
- Should include a biography section so that your employers and clients can get proper information about your skills.
- Include a testimonial section or reviews from past customers.
- It’s also good to have a contact form section so that visitors can communicate with you.
- Links to your social media accounts so that visitors can connect with you on various platforms.
FAQs on creating a website with WordPress
Here are a few common questions we come across when writing about how to create a WordPress website.
Get ready to take your WordPress website to the next level!
Great job. You’ve just created your very own WordPress website in under an hour!
Now, the fun really begins.
You can customize and expand your site however you’d like, add new pages, publish posts, or fine-tune it until it’s absolutely perfect.
To make sure you don’t miss a step along the way, we recommend this handy Website Launch Checklist you can download.
If you ever need a little guidance during the setup process, just refer back to this guide or check out our knowledge base for additional information on themes and page builders.
Ready to dive in and start building your dream website? Head on over to our library of website templates and let the creativity flow!
Disclosure: This blog may contain affiliate links. If you make a purchase through one of these links, we may receive a small commission. Read disclosure. Rest assured that we only recommend products that we have personally used and believe will add value to our readers. Thanks for your support!