- Section
- Troubleshooting: Missing Icons
- Spectra Patterns
- Contact Form 7: Multiple Column Fields
- Contact Form 7: Checkbox / Radio / Acceptance Control
- Unable To Style Contact Form 7
- Tab Index For Multiple Gravity Forms
- Getting Started With Spectra
- Exclude Heading From TOC
- Block Display Conditions
- Import Single Pages, Templates, & Block Patterns
- Enable/Disable Design Library Button
- Copy & Paste Style
- Container Flex Property
- Default Content Width
- Blocks Editor Spacing
- Collapse Panels
- Responsive Conditions
- Dynamic Content Extension
- Site Visibility
- Spectra Actions: Clear Cache
- Quick Action Bar
- Add Multiple Instagram Accounts
- Grid Builder
- Move Title Bar To Top
- Resolving Container Layout Conflicts
- Register High-Privileged Users
- User Roles Access To AI
- Database Update Instructions (Below 2.0.0)
- FAQ's: VIP Priority Support
- Whitelist Email Address
- Using ACF Repeater Field in Spectra
- Pixabay Image Search Feature
- How to Fix Stretched Spectra Images in WordPress 6.7
- How to Change Breakpoints in Spectra?
- Controlling Access to the Spectra Design Library Based on User Roles
- Multi-Column Form Block Using Utility Classes
- Why Am I Seeing Mixed Content or Non-HTTPS Errors?
- Importing Starter Templates With Spectra
- Getting Started With Spectra
- Manually Install Spectra Via FTP
- Automatic Beta Updates
- Rollback To Previous Versions
- Load Google Fonts Locally
- Activate Spectra Pro License
- Install Spectra Pro
- Translate Strings With Loco Translate
- Process Refund Requests
- Transparent / Sticky Header
- Change Site Logo
- Change Global Styles
- Disable Title on Posts & Pages
- Transparent / Sticky Header For Single Page / Post
- Change Header & Footer Patterns
- Custom / Google Fonts
- Reset Global Default Styling
- Manually Install Spectra One Via FTP
- Enable / Disable Header & Footer On Specific Pages / Posts
Clearing Cache with Spectra Actions
Spectra ensures your website visitors always see the latest version by working its magic behind the scenes.
Just like a temporary storage space, a website cache holds website elements to improve loading speed for returning visitors. While caching is generally helpful, sometimes it’s necessary to clear the cache to show recent updates on your website.
Spectra takes care of this automatically whenever you make changes to your website. It also integrates smoothly with popular caching plugins to manage your website’s cache efficiently.
This means you can focus on creating great content without worrying about the technical aspects.
This document explains how you can clear the cache of a website using Spectra actions.
Why You Need to Clear the Cache?
Migrating your site to a new host may bring about challenges, potentially resulting in site breakages. Furthermore, tweaking a post may disrupt CSS, affecting the display on mobile or desktop devices.
Similarly, regenerating site assets might occasionally cause the site to appear broken for your website users.
These issues commonly arise in environments with caching mechanisms like Varnish in Cloudways, file-based caching in SiteGround or something similar.
Typically, when changes are made to a page or the entire site, you should purge the cache to ensure the latest resources are served. Problems arise when the caching environment retains old resource URLs that are no longer available.
To streamline this process using Spectra actions, we’ve implemented internal hooks that allow purge functions to be seamlessly integrated.
This automation ensures that you can maintain an up-to-date and consistent experience by automatically purging outdated cache when changes are made.
We are trying to provide compatibility from our side for some of the known hosts.
How to Add Code Snippets to Your Website?
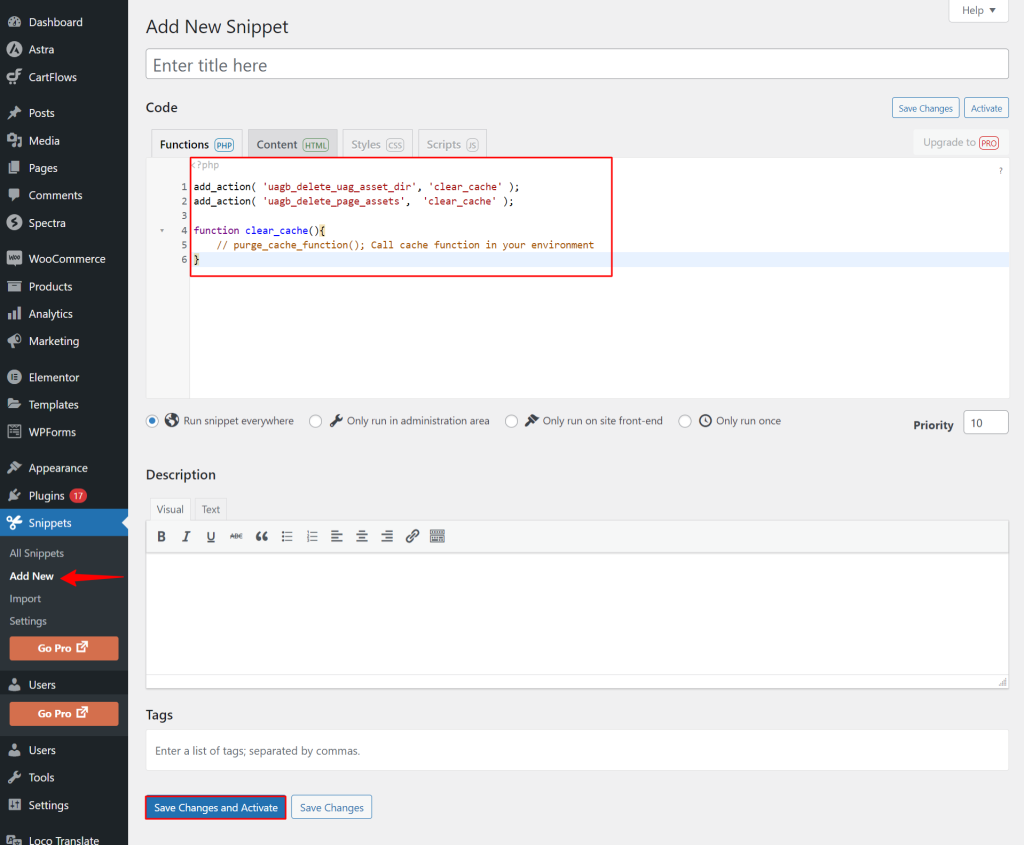
The below mentioned steps shows how to add code snippets to your WordPress website using a popular plugin called “Code Snippets.”
While we’re expanding support for various hosting providers and plugins in the future, here’s how to achieve this using Code Snippets for now:
Prerequisites:
- Ensure you have the “Code Snippets” plugin installed and activated on your WordPress website.
Steps:
- In your WordPress dashboard, locate the “Snippets” module.
- Within the “Snippets” section, look for the option to “Add New”.
- Give your code snippet a clear and descriptive title for easy identification later.
- Locate the tab labeled “Functions”. This is where you’ll paste the below attached code.
- Once you’ve pasted your code and ensured it’s correct, click the “Save Changes and Activate” button.

add_action( 'uagb_delete_uag_asset_dir', 'clear_cache' );
add_action( 'uagb_delete_page_assets',  'clear_cache' );

function clear_cache(){
    // purge_cache_function(); Call cache function in your environment
}
By following these steps, you can easily add code snippets to your WordPress website using the “Code Snippets” plugin.
Frequently Asked Questions
We don't respond to the article feedback, we use it to improve our support content.